


Daily practice can grow stale after months or years of playing an instrument. It’s easy to get into a rut of slogging through the same scales or études, and feel like this vocation or pastime that you love is a tedious bore. At those moments, you need to try something new to make practice more interesting and effective. There is impressive research out there that can help us do that, through sequencing and structuring practice in beneficial ways. That same research points to what not to do because it will inhibit your practice. More of the good stuff, less of the slog. That’s what we’re here for.
First, the Science
Few musicians receive the necessary training to optimize their practice. Instead, they learn by years of trial and error, and perhaps by their teachers sharing their trial-and-error strategies, which may or may not yield reliable methods for practice and performance improvement. When a musician hits a wall in their progress, their old, reliable strategies often no longer work.
Decades of behavioral and cognitive psychology research make a strong case for what does help performers progress. Problem is, those studies don’t necessarily lay out the steps for implementing the strategies and measuring their effectiveness in clear, actionable ways. Interleaving is one actionable strategy that can result in huge, long-term gains in your playing.
Getting Clear on the Terminology
Before we dive into interleaving and how to incorporate it into your harp practice, let’s cover a few terms that relate to practice time and structure. Researchers in behavioral science, cognitive psychology, and education have defined different types of practice structures. Here are a few that pertain to how you might set up your practice.
Within session structure refers to how you structure and sequence your practice within a single session. For example, if you practice for two consecutive hours (one session), what scales, études, and repertoire do you play? How long do you spend on each piece? How many repetitions do you complete for a problem spot before moving on? At what tempo do you practice each piece?
Across session structure refers to what happens from one session to the next. For example, during a week’s worth of practice, how often will you play a piece or technique exercise? When you think across sessions, rather than just within one, you get a big-picture idea of how much time is allocated to the specific elements of your practice, such as technique exercises and slow metronome work. This is information you can use to adjust your within session structures and plans.
Practice session here is defined as a continuous but discrete practice (say, two hours). If you schedule two such sessions at different points of the day, they are part of the across session structure. What you make happen during each of them is regarded as within session structure.
What you do within session and across sessions ties in to how you make decisions and monitor your progress. Within a given practice session, you might focus on a problem spot to work out fingering or get a muffle just right. But you’d also want to look across sessions to see if there are long-term effects of this within session practice. When musicians focus too much on what happens within a practice session without considering how it impacts their performance from day to day, they might believe they’re getting better when they aren’t.
These next terms relate to how you schedule thematerial of your practice within and across sessions.
Massed practice is when you practice the same passages or pieces within a particular session over a week or month. Let’s say you’re working on Bochsa’s Étude No. 1. You practice it for an hour on Monday but don’t come back to it until a week later. You’ve massed all your practice time for this étude within one session rather than across sessions.
Distributed practice is when you practice the same material across several days within a week or month. For the Bochsa étude, you’d practice it for 15 minutes on Monday and again on Wednesday and Friday of that week, thus distributing that practice across time.
Cumulative practice is what educators Drs. Anita Archer and Charles Hughes define as a “method for providing distributed practice by including practice opportunities that address both previously and newly acquired skills.” As you build up your repertoire and technique, you’d practice both mastered and new pieces within the same session. Many musicians do not keep mastered repertoire fresh in their fingers, but a cumulative practice routine helps keep that repertoire intact and sharp.
Massed, distributed, and cumulative practice are applicable to within and across session practice. It’s possible to distribute the Bochsa étude within hour-long sessions on the same day or across several days of the week. That’s different from massing it in a 30-minute block once a week.
Let the research guide you
read the research
If you are curious about the research referenced here that compares the effects of blocked and interleaved practice, and you’re the type that revels in reading research papers, check out the original sources:
What does the research say about practice structure? To date, the positive benefits for distributing and accumulating practice over time exceed those of massing it. That takes us to how to structure the material you practice within a session. This is where we get granular, at the level of repetitions.
Blocked practice is practicing several repetitions on the same target spot. It could be playing measures 1–9 of the Bochsa étude 15 times or for 10 minutes, building up the tempo with each repetition. You would then stop practicing those measures, move on to something else, and not return to the étude until your next planned session.
Interleaved (or interleaving) practice is when you practice a target area for a short period of time, move on to something else, and then return to the target area a bit later in the session. Thus, 15 repetitions of a problematic passage in our favorite Bochsa étude, a few minutes of octave scales, and then back to the Bochsa passage.
How does blocked practice stack up against interleaving? Researchers have compared the effects of blocked and interleaved practice in sports performance (Goode & Magill, 1986), mathematics learning (Rohrer, Dedrick, & Stershic, 2015), music making (Carter & Grahn, 2016), and other performance areas. In all cases, interleaving came out on top for long-term gains—improved badminton serves, math test scores, and musical passage performance.
Even with these findings, many musicians don’t use interleaving. In my experience from coaching musicians, some don’t know about it, and some are nervous to try interleaving because they fear that within a practice session, they might see diminished results. Blocked practice can bring about immediate improvements, an obvious outcome of countless repetitions on the same measures or excerpt. If you play the same nine measures multiple times, they will sound better than they did before you started. But what happens when you return to those measures a few hours later or the next day?
Blocked practice produces short-term (within session) gains that don’t really last. Come back the next day, and you may find that the improved level you achieved has disappeared. What to do? Start this next session with yet another round of blocked practice. The pattern continues. Meantime, interleaved practice often results in stronger across-session gains, rather than shorter-lasting within-session improvements.
Researchers Carter and Grahn found exactly that in their 2016 study with clarinetists, which looked at the effects of blocked and interleaved practice for 10 performers. Each clarinetist was given two sets of excerpts to practice. In the blocked condition, they practiced one concerto exposition for 12 minutes and then switched to practicing a technical excerpt for 12 minutes. In the interleaved condition, they practiced a second concerto exposition and a second technical except, alternating between the two pieces every three minutes until they hit 12 minutes of practice on each piece. Before the study, the clarinetists recorded their sight-reading performance of the pieces. At the end of practice day, and the next day, they again recorded their playing of the excerpts. Adjudicators scored the quality of the interleaved pieces higher than the blocked pieces. Further, participants reported that their attention to practice, errors, and goal setting improved more in the interleaving condition.
This study and others on interleaving have also shown that performers gravitate to blocked practice conditions because they think they’re getting someplace faster. It feels good to improve, right then and there, at something you previously struggled with, which is what blocked practice gets you. But when you start looking across sessions, the real payoffs come with interleaved practice.
Bravi for staying with me so far. Now we can get into the step-by-step of interleaving practice.
Getting Started with Interleaving
We can experiment with applying interleaving practice using pieces recommended by harpist Jane Yoo: Mouvement pour harp by Marescotti; Jeux d’eau, Op. 29, by Salzedo; and Divertissement à la française by Caplet.
A professional harpist like Yoo practices several hours a day, with a schedule like the schedule below. Referencing our terms on practice times and structures, this schedule provides multiple opportunities in a given week to distribute practice material across sessions. You might decide to implement interleaving practice within some sessions but not in others, or sprinkle in some cumulative practice on Sunday evenings to maintain mastered repertoire. To ease into the approach, you could start by applying interleaving to a few days of practice, like the Monday, Tuesday, and Thursday morning slots in our sample.

Step 1: Determine the performance date for each piece
First, get a handle on when you’ll be performing pieces in different settings. There’s no point to implementing a new practice approach right before a big concert or audition. You need time to apply the new strategy.
Let’s say you will be playing the Marescotti for a masterclass one month from now and then again in a concert in two months. That gives us time to apply interleaving within and across practice sessions.
When you know you have a performance date, you can work back from it to find how many days and weeks there are to practice. If you’re playing harp for fun (no scheduled performances), you can experiment with how you implement interleaving. I recommend alternating between interleaved and blocked practice days for a couple of weeks to observe the effect of each. During this time, consider:
- Which method did you prefer within a practice session and why?
- Which method is producing the greater benefits across sessions?
- Are there better and worse times to apply interleaving?
Step 2: Establish what you want to accomplish in each section of your pieces
To determine your goals, play through and video record yourself playing the pieces and listen back to them. You will notice things. For example, perhaps you can play the first eight measures of Caplet at performance tempo with hands apart, but when you play them hands together, you achieve 90–100 percent accuracy at half that speed. Later, when you get to the largement section, you still need to think through the fingering and transitions between chords. As you identify what needs work in each piece, you will acquire information for deciding which strategies to apply within the interleaved schedule.
During this step, organize your observations in a format that is easy to review later on. I usually use a spreadsheet or handwrite a pen and paper table like the one below.
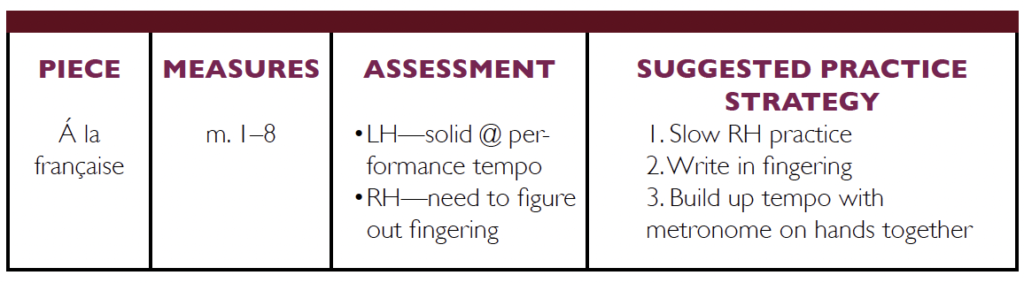
Regardless of format, the key pieces of information to capture are: name of the piece, targeted measures, and assessment notes for those measures. The assessment notes should indicate your status with fingering, rhythm, dynamics, tone, or whatever is most pressing to you at that moment. What you note will also depend on how far along the piece is to being performance ready. In some cases, you may need to put your attention on the fingering, so dynamics are not your initial focus. In other cases, fingering and dynamics are well established, so you’ll attend to musical expression. Note any practice strategies that might help you resolve that section of the music—these are what you’ll apply during your interleaved practice.
Step 3: Rank the perceived practice effort for each section of repertoire
With the performance dates established—whether that’s performing a piece in a lesson or on a stage—and specific practice goals set, you will have a better idea of how to distribute your time across practice sessions in the days and weeks ahead. You can also rank the practice effort you think will be needed to up the performance level for each section.
Looking back at your assessment results, figure out which sections need the most attention and categorize them as high effort. This could be due to difficulty or how much prep work (fingering, coordination) is required to play it at a reasonable pace. Next, identify sections that require work but not as much as the high effort sections. These fall into the medium effort category. Finally, place sections that need polishing or slight tune-ups into the low effort category. These will get the least amount of your practice time.
If you’re using a spreadsheet for tracking the results of your assessment, indicate high, medium, and low effort in separate columns. This data will help you design an interleaved schedule in which your time and effort are effectively allocated.
Step 4: Design the interleaving schedule
Here we go, with a few suggestions and factors:
Assign letters to categorize and organize your sections. A one-hour schedule might look like this:
A B C A B C A B C
A = Measures 1–8 of à la française
B = Page 4 of à la française
C = Measures 50–64 of Jeux d’eau, Op. 29
You can schedule interleaving in a predictable (ABCABCABC) or randomized order (ABCBCABAC). Try both and see which one works better for you.
You can structure interleaving blocks on time intervals, repetitions, or milestones. With time intervals, practice a section (e.g., A) for a certain number of minutes and then move to the next practice section (B) for a specified amount of time. If you practice by repetitions, set the number you will complete before moving on to the next section. For example, 10 times of A before moving on to B. With milestones, look to hit a small goal (milestone) before progressing in your schedule. For example, your small goal might be to build tempo from 50 to 55 beats per minute with zero errors, write in the fingering for eight measures, or add dynamics to the first page.
Interleaving time intervals and repetitions can be constant or varied. For example:
- Constant intervals A (3 min.), B (3 min.), C (3 min.)
- Constant repetitions A (10 reps), B (10 reps), C (10 reps)
- Variable intervals A (6 min.), B (4 min.), C (5 min.)
- Variable repetitions A (15 reps), B (5 reps), C (30 reps)
Bear in mind the amount of material you’ll be practicing. For a 20-measure passage you want to practice slowly—50 beats per minute (in 4/4)—three minutes won’t be enough; played continuously, the maximum number of beats you can play is 150, not even two rounds of the 20 measures. You need to do the math and schedule appropriate-length intervals that also include stop and adjusting time. Alternatively, you might want to interleave repetitions or use a milestone approach instead.
If we implement interleaving into the Monday (three hours), Tuesday (two hours), and Thursday (one hour) morning sessions on Yoo’s schedule, we could break those sessions into smaller chunks and slot in sections that need high, medium, and low effort work, whatever those might be. The first hour of our Monday practice could look like this:
A (6 min.): C flat major octave scales and arpeggios
B (3 min.): à la française, measures 32–51
C (6 min.): Jeux d’eau, Op. 29, pg. 3
D (3 min.): Jeux d’eau, Op. 29, pg. 6, systems 4–6
This hour consists of four interleaving blocks at randomized intervals:
ABCDBDACBACD
If this schedule looks right to you, repeat it, randomize it, or otherwise change the length of the intervals for the next hour of practice. Every feature of interleaving—predictable, randomized, intervals, repetitions, milestones, constant, and varied—should meet your needs. Through self-observation, you will learn what works best for your skill level, retention, and performance requirements. But generally speaking, the more variability you have in your practice session (switching things up), the better.
Step 5: Implement the interleaving schedule
Once you have an interleaving schedule mapped out, you can begin practicing. To make it work, follow the plan you set up for yourself. Adhere to the sequence and duration of the planned intervals.
As researchers and teachers have found, musicians often want to stay on a targeted section until all errors disappear and they have achieved their goal (massing). But interleaving is about getting your performance level to a point where you leave it and come back to it later so as to bring about deeper retention and recall. Because it’s all too easy to default to old habits, here are some tips to help you stick to your interleaved schedule.
Interleaving materials need to be accessible. Once your schedule is set, you’ll need quick access to the music of your pieces. The transition between sections should be as quick as possible (a few seconds) to maximize the benefits. Have all music ready to go, in the right order, and opened to the relevant page.
Use a timer. If you’re using your phone as a metronome, you could use a kitchen timer or some other device as your dedicated timer. Some musicians prefer an interval timer app on their phones that automatically transitions from one interval to the next.
Use a tracking sheet during your practice. If you have a spreadsheet for your interleaving schedule, click to the next cell every time you move to that next slot/interval. Or, if you write your schedule on a Post-it note, check off each completed interleaving slot/interval.
Mark in your music where you left off in that interleaved slot. If you run out of time before you come to a pause in the section you’re working on, make a note of where to pick up, such as a star on that spot in your music, so you can quickly identify where to resume in that section.
Step 6: Make session notes and prepare for your next practice session
At the end of a session, while things are still fresh in your mind, make a few notes about how it went, what you want to do again in your next session, and what you need to adjust. Try to set what you’ll practice in your next session, whether it’s later that same day or in a few days. In your spreadsheet or on your tracking log, make notes about where to distribute the same sections across the week. This will help you continue to benefit from distributed and interleaved practice.
As you make your plan for the next session, refer back to Step 4 and think about what you might change: constant or varied; intervals, repetitions and/or milestones.
Step 7: At the start of your next session, test yourself
One benefit to interleaving is the residual effects you can see in subsequent practice sessions and days. When you start your next session, do a cold play-through of the previous day’s interleaved material. Don’t worry if your playing isn’t perfect, but do note what got better since your last session. If you plan to return to some of the same spots, you can decide where to start and if you should increase or decrease the amount of time or number of slots dedicated to a specific section of the piece.
Step 8: Assess progress across sessions
Monitor your results with interleaving, particularly how you improve across sessions. Even with research and guidelines for how to approach this type of practice, it’s up to you to adapt it to your needs. Periodic recordings of cold play-throughs and, later on, real performances will be as instructive as any teacher-driven lesson.
Stick with It
Musicians who make the transition to interleaving, and wean themselves off of massed practice, see great benefits. It is tempting to stick with an approach that gets you better in the moment, because that’s easier than trying something that takes more time. To appreciate the benefits of interleaving, you have to actually do it, and do it consistently for several weeks and months on varying technique and repertoire requirements. You’ll get there, with trust in the process and yourself. •