




A few weeks ago, I took my harpmobile in to my trusty mechanic for a tune-up before a long road trip. He checked the brakes, changed the oil, and finally fixed that mysterious squeak I kept hearing when backing up. I gladly paid the bill and was ready to roll. But before I left for my road trip, I topped off my wiper fluid and coolant, changed the air filter, and changed the bulb in my driver’s side turn signal. There’s no way I could have changed the worn out brake pads, but the smaller maintenance jobs are simple enough that even I can figure them out, and they need to be done more often than a yearly tune up.
The same can be said for the maintenance and minor fixes your harp needs on a regular basis. No harpist I know wants to try to do major repairs on their own harp (nor should they), but there are plenty of things we can do between harp regulation visits to keep your harp happy and healthy. We asked several harp techs to share their advice for harpists about easy fixes and maintenance they can do at home between regulation visits.

Emporia, Kansas
Harp technician Steve Moss services pedal and lever harps across the Midwestern and Western United States. His daughter Liza is following in his footsteps, currently apprenticing with him—you can read our profile of the father-daughter team in the March/April 2022 issue of Harp Column.
“It’s not a very sexy answer, but the most important thing a harpist can do to maintain a good sound and lengthen the life of a regulation is to replace strings before they become worn, especially in the top two octaves. Strings that have worn away where the discs engage them [see illustration below] will not play in tune in their natural and sharp positions. The nylon strings most harpists use in the first octave often last a long time, and thus get a lot of wear before they break. Anyone who plays their harp every day and plays intermediate or advanced repertoire should consider replacing first and second octave strings at least once a year.
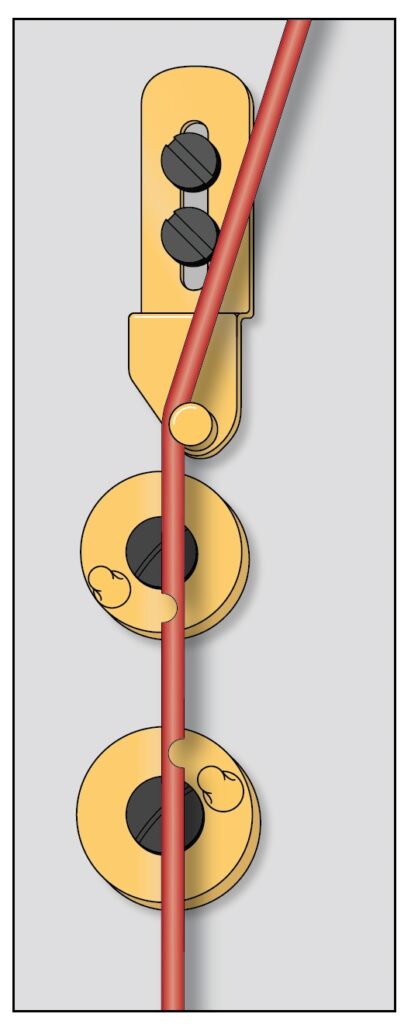
Illustration by Moss Harp Service
“Every harpist whose harps have standard, tapered tuning pins, should work to keep the tuning pins well-seated in their holes. When tuning, exert pressure towards the neck on your tuning key, to keep the pin tight in the hole. If you replace a string, the multiple revolutions of the tuning pin needed can make the pin loose. As you tune the new string, make sure to press toward the neck with your right hand while bracing your left against the neck in the opposite direction. Nearly every day I have someone bring a harp in for regulation and say their principal problem is one or two strings that won’t hold tune. In most cases, this is a problem the harpist can fix herself. There are some exceptions, including small harps with zither pins (tuned from the string side) and Dusty Strings harps made since about 2001, which do not use the tapered pin.
“Lever harp issues vary with the type of lever, but two issues common to all are bracket screws that work loose and cams that don’t stay engaged. The bracket screw is the one fastening the lever to the harp’s neck. I say one, but on some kinds of lever there will be two. In either case, get the appropriate type and size of driver (check with the harp maker if you’re not sure), and check all the bracket screws periodically. Loose levers can rotate or move, causing buzzing and poor intonation. The cams are the moving parts that are raised to engage the string. Most levers have a nut and bolt system of some kind that keeps the cam loose enough that it can be engaged and disengaged, but not so loose that it buzzes or falls down when the string is played. Keeping the cams in good working order will minimize annoying playability issues and prolong the time between regulations.”

San Francisco, California
For longtime California-based harpist and technician Karen Gottlieb, instrument care is near and dear to her heart. She is a current board member of the American Harp Society where she is working with the organization to improve access to professional harp technicians and raise awareness of the importance of caring for your instrument.
“The first thing is that you want to make sure your tuning key fits properly. People think you buy one tuning key and it will last you for the rest of their life. As you tune, the inside of the tuning key wears out, so it’s not grabbing the tuning pin as well. So I highly recommend every few years you replace your tuning key. When the tuning key gets worn out and looser, the problem is that it also grinds down your tuning pins, and eventually the tuning key won’t grab the worn down tuning pin. The key will just spin around on the tuning pin. That’s a worst case scenario.
Definitely do not try this at home
While there are lots of easy fixes you should definitely try on your own, there are a few things you absolutely should not try at home. Leave it to the pros.
“I generally discourage harpists from trying to touch up dings, dents, and scratches on their harps. There is a lot of knowledge and skill involved with repairing finish damage, and it is easy to end up with a repair that is more unsightly than the original problem. Qualified touch up experts can be found by checking with instrument repair services in your area, such as piano technicians and luthiers.”
—Steve Moss
“Pedal harp regulation can be very tricky. Diagnosing problems takes a lot of experience. It’s an art form, and each harp is unique. You’d be amazed what we see. Best to leave regulations to a trained technician.”
—Karen Gottlieb
“Don’t try fixing a link buzz, which is a buzz up inside the neck. It may be easy to find, but difficult to fix.”
—Liza Jensen
“Don’t adjust the back plate screws. Leave that to your technician.”
—Peter Wiley
“The most important thing a harpist can do is to know how to properly change a string. When you change a string, the string ends should not touch each other inside the back of the harp. Anything that touches can buzz, and the harp is designed to amplify sound, so you can get a big buzz from string ends touching something else. Keep the knots on the string portion small so there aren’t excess loops and ends that could possibly touch another one, and be sure any excess doesn’t touch the wood inside the harp. I always align the string ends so that they are horizontal rather than vertical. If they are horizontal, chances are they won’t touch anything. You want to have three or four wraps of the string around the tuning pin. If there are too many wraps and they go all the way to the neck of the harp, it’s putting a lot of torque on the neck. I see this a lot with the lower gut strings, because the gut stretch so much. My recommendation is when you put a gut string on, you pull it up taut, not tight, and then you start wrapping it. The wire strings are different. The trick with wire strings is to put it on and then pull it back one full octave plus two strings, then wind the string and pull it up to pitch. This will give you the right number of wraps. I have found the same thing on lever harps too.
Tune with your pedals in flat. This allows the string to stretch evenly. And another thing I notice is that tuning pins are often loose. Harpists—both pedal and lever—need to push in towards the neck as they tune to keep them tight so there is no slipping. I get a lot of harpists, especially lever harpists, telling me their harps don’t stay in tune. This usually corrects the problem.
“For lever harpists, if you are handy at all, you can probably regulate your own lever harp. It is not difficult, it just involves some careful thinking. Dusty Strings has a repair kit that includes directions and it works fantastically. It’s unbelievably easy. That’s what I recommend for lever harpists.
“Most harpists have insurance, but many don’t. I’ve heard a few horror stories recently of harpists who were waiting to receive their harp after purchasing it, and the harp was seriously damaged during shipping and they were not covered! The most vulnerable time for your harp’s safety and wellbeing is when it’s being moved. Most accidents happen when a harp is being moved or transported for any reason—at gigs and performances, during shipping, loading in and out of a car, even moving across a room. Damage is never cheap, and usually runs in the thousands of dollars, so be insured. Amateur harpists can insure their harp under homeowners policy, but they may need a special rider on the policy for the harp. However, if a harpist accepts any form of remuneration (e.g., money, gift, meal), they are now considered by the insurance company to be a professional, so best to be covered professionally if you choose to move your harp at all.”

New York, New York
World traveler and NYC-based harp technician Liza Jensen is a problem solver who loves to teach harpists of all ages to empower them to care for their instruments.
“The most common problem that a harpist would need to solve is how to fix a buzz. What are some things you can do to diagnose a buzz? The first thing to do is check your string ends—the anchors for your strings. When you make a knot, make sure that your string ends aren’t too long. You don’t want them to touch the soundboard. The buzz can sound like it’s coming from somewhere else, but it’s not.
“It’s good to know how to change a pedal rod. It’s a little scary, but definitely doable. I have talked many harpists through it on the phone and they have successfully fixed their own.
“Changing a broken pedal spring is not complicated, but it takes a lot of strength to do it, and you have to be careful. It’s easier if you use vice grips.
“People tend to be afraid of the levers themselves, but levers are very simple. Fixing broken levers is not rocket science. Let’s say the handle broke on your lever. The lever is on your harp with one or two screws. Order a new lever from your manufacturer, pop off the string, unscrew the old lever, and put on the new lever.”

Albuquerque, New Mexico
Well-known among harpists as the Harp Doc, New Mexico-based technician Peter Wiley has been servicing harps for decades. First with Lyon & Healy, and now on his own, Wiley has seen just about everything there is to see in harp repair and maintenance.
“To fix a broken disc, first you need the replacement disc. Call your manufacturer and be specific with what you need—natural or sharp, harp model, and approximate year it was built. Discs have changed over the years. You need to remove the old disc, which should be hard to loosen with a screwdriver. Start with pedal in flat, use two hands to push the string towards column and lift it up out of the string nut and set the string to the right of the disc next to it. Then put the pedal into sharp. This is important because it will show you where to align the new disc. Look at the alignment of the disc pins. Imagine a clock and fix in your eye the time that the disc pins are pointing to. It’s probably something like 12:15 or 12:30—just off of being straight up. Next, using a screwdriver that fits the screw, use a ‘dagger grip’ for screwdriver (not a ‘sword grip’ like you would hold a knife to spread butter) and use the screwdriver to loosen the screw. Remove the screw and unscrew the old disc. For all harps except Camacs, the threading on the disc is backwards—lefty tighty—so you go clockwise. Screw on the new disc—counterclockwise—all the way down until it snugs up to the bottom. Then unscrew the disc one full revolution to bring it back to that 12:15 position. Then put the screw in and hold the disc still while you tighten the screw. Put the pedal into flat, lift the string up using two hands, and put the string back into the string nut. Move the pedal and test and see if you have a buzz. If it buzzes you need to loosen the screw, turn the disc a little more counterclockwise so that it twists or grips the string some more. Last and most important, tell your technician you replaced that disc.
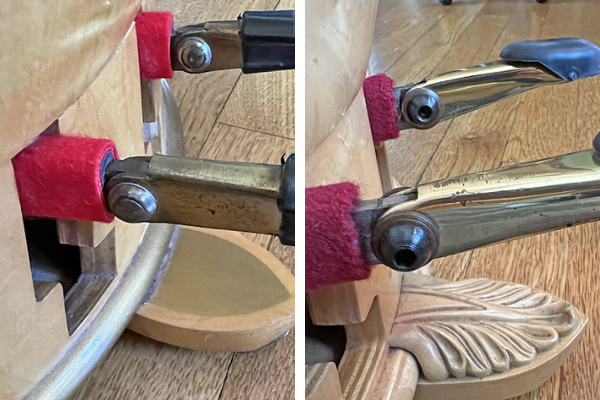
“Harpists should be able to tighten loose pedal brass if you have a floppy pedal. There are two systems used to attach the pedal brass. Most harps have nuts, bolts, or screws that attach them. Older harps have a brass rivet that’s not a screw of any sort. The rivets need to be tightened by a tech and only a tech. You determine by looking at the sides of where it attaches and see if it requires a hex wrench or a screwdriver to turn it, you can tighten or loosen it yourself. Turn it a little bit and test it so you don’t tighten it too much. In just a quarter of a turn, it can go from loose to locked.
“Clean your harp. Get a soft cotton washcloth, dampen it with lukewarm water, and wipe down the sides where your arms touch the harp. Stop after 15 seconds and let the harp dry out. Wait an hour and wipe it down again to finish the job.
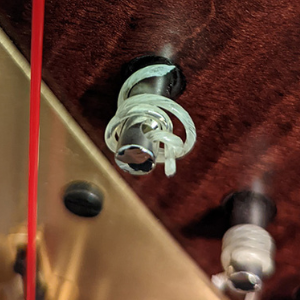
“When a string breaks at the tuning pin, you should be able to determine the cause of the string breakage—whether it was caused by the tuning pin or if the string just broke on its own. If the broken string has a pigtail [see right] that means it’s not the tuning pin. Almost all gut strings break on that last wind closest to the neck. A sharp edge inside the string hole could cause a string to break, but I’ve seen that maybe three times in my entire career. In most cases, blaming the tuning pin for string breakage is like blaming the street for your shoes wearing out.
“You can minimize mystery buzzes in your harp if you take care of string knot ends. Do not leave big string knots and long tails on the inside of your harp. The reason is that string knots buzz, and those are buzzes that can come and go. After the string is pulled up and the knot is set against the center strip, you can take a pair of side wire cutters and trim off all the excess tails.” •