


Get notation tips and tricks from pros in our article extra Behind the Notes.
Do you want to publish your own music? You’re in luck. Digital publishing tools have never been better or easier to use, making it easy for anyone to jump into the game. But just having the next greatest harp arrangement floating around in your head isn’t enough. You’ll need to turn that idea into a professional looking publication. While newer notation programs like Musescore and Symphony Pro for the iPad have made it easier and cheaper for anyone to crank out a quick arrangement, the old stalwarts Sibelius and Finale continue to offer the most bells and whistles, especially for harpists. We outlined our favorite Finale shortcuts in the November/December 2018 issue of Harp Column, so in this issue we’re going to give you some tips and tricks for turning your manuscript into a masterpiece using Sibelius notation software.
Getting Started
Supplement Sibelius
Plugin/font recommendations to expand the program’s out-of-the-box capabilities:
- Line Between Notes Allows you to create glissandi firmly anchored between two notes.
- Norfolk Harp Std font Includes harp specific symbols treated as text characters.
There are several notation programs that produce professional looking results, but their approaches are extremely different, especially when it comes to harp-specific notation. Sibelius relies heavily on plugins to extend its capabilities, so you’ll want to install our list of recommendations to help with notation like harp symbols and pedal diagrams. You’ll also want to have a good understanding of the Sibelius toolbar and keypad window before you start to apply the tips given in this article. For more help on getting started with Sibelius, take a look at some of our recommended resources, including a cheat sheet for keyboard shortcuts. One final note: the tips in this article were generated using Sibelius 7; you may need to make modifications if you’re using a different version of the software.
Harp-Specific Lines and Symbols
Glissandi
Sibelius offers several out-of-the-box glissando options, including a wavy line and a straight line with the “gliss.” abbreviation built in.


- Select the starting note
- Go to Notations/Lines/Glissandi and select the option you want; the line will appear horizontally in the score
- Drag the ends to position
Alternatively, you can apply the line by selecting it, clicking in the score, and positioning the ends.

This method is the easiest way to create a glissando, but it’s not the best way, since changes to your score layout may cause your glissando lines to become out of place. For a more professional look, use the Line Between Notes plugin. This is not a default plugin so you’ll have to download and install it first. Creating your glissando with this plugin will anchor both ends to the notes you specify, regardless of whether you make changes to the layout.
- Shift-click to select both the starting and end note of your glissando
- Go to Home/Plugins and open the “line between notes” plugin
- Choose the type of line you want; the line will appear in your score anchored between your starting and end note.
Are you using the latest version of Sibelius? Lucky you! Version 8 includes magnetic glissando lines that attach to the start and end note.
Hot tip: Plugins can be found within several different toolbar tabs. If you’re struggling to locate a plugin, chances are you’re in the wrong tab.
Harmonics and other symbols
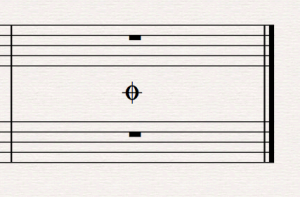
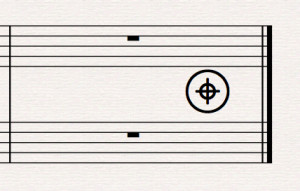
Sibelius doesn’t do a great job with providing harp-specific symbols out of the box, but fortunately there are some easy workarounds. We can thank our friends in the percussion section for a quick and easy harmonic symbol shortcut. (The articulation symbol “open/harmonic above” will also do the job, but the percussion choice requires less scrolling.)
- Select the note where you want the harmonic
- Go to Notations/Symbols/Percussion/…techniques/open, and click
- Your harmonic will appear over the note you selected; you can also reposition it using the arrow keys

As with most things Sibelius, copy and paste is your friend. To apply a series of harmonics, simply copy the symbol, select another note, and paste. Lather, rinse, repeat.
You can find other useful harp symbols in the same Notations/Symbols palette. Scroll through it to find things like ornaments, da capo and coda symbols, diamond shape notes, and more. Once you’ve used a symbol once in a document, it will appear at the top so you don’t have to scroll to locate it a second time.
Hot tip: Can’t find the symbol you’re looking for? Try the Notations/Lines palette instead for things like brackets and slurs. Better yet, simply type the name of what you’re looking for into the “find in ribbon” search bar, and Sibelius will jump you straight to that option.

Muffles
Muffle (or dampening) symbols can be achieved a few different ways depending on the look you want. For a quick and easy muffle:
- Go to Notations/Symbols/Percussion/…techniques/damp, and click
- Click in the score where you want the muffle
- Drag or use arrow keys to position
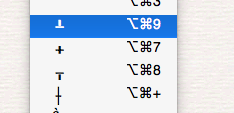
This percussion muffle will do the job, but it’s smaller than ideal. There is a better way. First, you’ll need to install the Norfolk Harp Std font. This font includes several harp-specific characters, the most useful of which are three muffle symbols. Since they are treated as text characters, you can increase the size to suit your layout.
- Right click or use keyboard shortcuts to enter text mode
- Change the font to Norfolk Harp Std, point size 30
- Enter 8, 9, or shift X depending on the muffle you want
- Resize if necessary
- Drag to position


Even more Norfolk symbols
While we’re talking about the Norfolk font, check out some of the other handy harp symbols included with this font. The documentation is a bit lacking, and the best way to find all the symbols is trial and error. Here’s a cheat sheet for some of our favorites:
6 = finger nail symbol
shift-\ = tuning key symbol
a (ascending) and b (descending) = Salzedo “Aeolian chord” symbols
` = Salzedo “Thunder” effect
Shift-P = Salzedo “Slide” symbol
Shift-Q = pres de la table symbol
Shift-R = Salzedo “Thunder” effect symbol
Shift-S= Salzedo “Whistling Sounds” symbol
The Norfolk font can also be used to enter pedal diagrams using the Shift-L, M, N, and O characters.
Rolled Chords

Do you want to specify a chord that should be lushly rolled? You’ll find the vertical wavy line symbol on the fifth keypad layout.
- Choose any note in the chord
- Choose the line you want; the line will appear in the score
- Extend the line to cover both clefs if needed
Alternatively, you can choose a wavy line from the Notations/Lines/Arpeggios palette.
Pedal Changes and Diagrams
Pedal changes

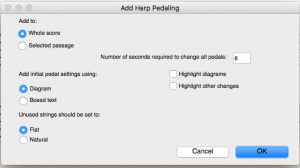
Pedal changes and diagrams can be entered either manually or automatically, using the Add Harp Pedaling plugin, which is included with Sibelius so you don’t need to install it. This feature is surprisingly sophisticated, although it does include some options that were clearly not invented by a harpist such as the dreaded “boxed text” pedal diagram which has been useful to no harpist, ever. (Composers: just say no!) To automatically add pedal changes, go to Home/Plugins/Add Harp Pedaling, and set the desired options:
- If you don’t want to apply pedals to the entire score, select a passage before opening the plugin.
- Choose “diagram”
- Set unused strings to “natural”
- Keep the default setting of 6 seconds to change all pedals
Adding automatic pedals is a big time saver, but chances are it won’t be perfect. You’ll probably need to go back and manually adjust individual pedal changes to suit your own preferences. To move a pedal, simply click on it and drag it with the mouse or keyboard arrows to position it exactly where you want it.
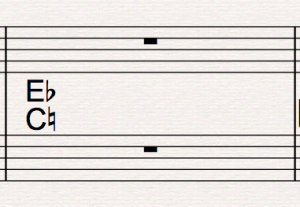
You can also skip automatic pedals and add them manually from the start:
- Use keyboard shortcuts or right click with your mouse and scroll down to select “Text/Technique”
- Click in the score where you want the pedal to go
- Type the pedal letter
- Use keyboard shortcuts or right click to select the flat, natural, or sharp symbol from the pull down menu (be sure you’re still in technique text mode or you won’t see these options)

Adding pedals automatically or manually as described above will leave you with pedal changes that use your default “Technique Text” font and size.
You can easily change this default by selecting a pedal change and making adjustments to font and size from the “Text” tab, but that can be cumbersome if you have a lot of pedals.
Want to take it one step farther? Create and save your own “pedals” text style. You’ll need to enter pedal changes manually, but it’s worth it to consistently get the exact look and size you want. Note that the text style will only apply to the document you’re working on, but if you paste a pedal using that style from one document into another, it will import the text style.
- Go to “Text” and click the small arrow to open the “Edit Text Styles” window
- Choose “Create new text style,” scroll down to “Technique,” then click “yes” to copy settings
- Name your new style (ex. “Pedals”) and set the options you want. (Hint: a non-serif font like Arial in pt. Size 13 or 14 works well.)
- Make any other “advanced setting” adjustments you may want and save.
Not sure about advanced settings yet? No worries. If you create your pedals using their own text style, you can make adjustments later and they will automatically apply to all your pedal changes in the document. It’s like magic!
Pedal diagrams
Using the Add Harp Pedaling plugin will also create a pedal diagram at the beginning of a selected passage or score. Sibelius also makes it easy to enter pedal diagrams wherever else you may want by using technique text. Flat, natural, and sharp positions are included, along with a line to separate the middle of the diagram. Each option is treated as a text character, so you’ll want to count carefully to avoid ending up with a diagram including, say, six or eight pedal settings.
- Enter “Technique text” mode using keyboard shortcuts or right clicking with your mouse
- Scroll to the four pedal diagram options and choose the one you want.
- Repeat to complete your diagram
- Adjust the size of your diagram by selecting the whole thing and increasing the font size from the Text tab.

Like many things in Sibelius, once you have a diagram or two in place, you may find it easier to copy and paste rather than starting from scratch each time.
As mentioned earlier, you can also use the Norfolk Harp Std font to add pedal diagrams. Simply enter text mode, change the font to Norfolk, and use the Shift-L, M, N, and O characters to create your diagram.
Making it Pretty
Beaming, stem direction, and cross-staff notes

Careful attention to beaming, stem direction, and staff placement can make your score more harp friendly.
- Beaming can be customized using the third keypad tab. There you’ll find options to join or break beams from the default layout.
- To change stem direction, select a note or group of notes and hit “X.”
- To change default staff placement (for example moving a bass clef note to the treble clef staff), go to Note Input/Cross-staff notes, and choose either “above” or “below”


Another useful tool to control these elements is voicing. By using the numbers at the bottom of the keypad, you can enter up to four different voices, which are visible by color, and control things like beaming and stem direction independently from voice to voice. This can be helpful with passages like the excerpt below from Hasselmans’ Petite Valse, where we used voicing, beaming, and stem direction to make this large, two-handed arpeggio easier to read.

Adjusting these three elements can help make your music more harpistic, but be careful not to stray too far from standard notation practices or you might do more harm than good.
Hidden Objects
While we’re on the topic of voicing, let’s talk about hidden objects. If you’re getting fancy with voicing, chances are you’ve got some hidden objects lying around. To hide notes and rests from view, select them and hit shift-command-H, or right click and choose “Hide or Show.” Check out what our Petite Valse excerpt would look like if we didn’t hide the unwanted rests from the second voice (second voice notes appear in green):

More layout tips and tricks
The great thing about Sibelius is that it’s designed to take the guess work out of your layout. Once you start adding notes to a score, you’ll see that Sibelius automatically displays them nicely according to standard notation practices and optimizes the layout to avoid dreaded collisions. But it’s not always perfect, and thankfully you can override Sibelius’s hidden brain at any time. Here are a few quick and dirty tips:
- The first trick in your arsenal is adjusting “magnetic layout.” Right click on an object and scroll to magnetic layout/off to have complete control over that item’s placement.
- Want more space between a staff for pedals or whatever? Just grab the bottom staff and drag. Voila—more space!
- Want to force a line or page break? Go to Layout/Breaks to see your options. You can also select a passage first then go to Layout/Format to apply options to that passage.
- Is Sibelius refusing to play nice with your beamed group of notes? You can move that beam wherever you want by grabbing it and dragging up or down. Take a look at this example to see how we turned the first measure into the second measure simply by dragging and adjusting the beam:

Before you begin a new project, you’ll want to visit the Appearance tab and take a look at your “house style” where you can specify preferences for things like note spacing and engraving rules. In the Layout tab you can set your paper size, staff size, staff spacing, and more. There are so many sizing and spacing options available in these tabs that you may think your head is about to explode. If you don’t know where to begin (and you’re probably not alone), simply set your paper size and use the defaults to start. You can then adjust settings one at a time to get the look you want or to address layout issues you may encounter along the way. You can also visit our recommended resources to learn more about the settings professional engravers swear by.
Puzzle Pieces
If you’ve worked with Sibelius, Finale, or any other sophisticated software program, you probably know that mastering it is an ongoing puzzle, not unlike playing the harp. Just when you tackle one skill, a new challenge comes along. Reading the documentation and our suggested resources will go a long way in helping you understand these programs enough to make your masterpiece look as good as it sounds. But there’s no substitution for good old trial and error to find out what works and what doesn’t. Do you have some great Sibelius tips to share? Leave your comments below! •
Understand the Rules Before You Break Them
Music notation has been around ever since monks started coloring elaborate neums into Gregorian chant manuscripts. (Remember that chapter in your music history textbook?). So it’s no surprise that the standard music engraving practices we use today have been evolving since that time too. Notation programs can be incredibly useful in helping you understand and follow these practices, but sometimes you’re going to have to make your own decisions, like whether that beamed group of septuplets should point up or down, or whether that slur mark should go under or over a group of notes. These decisions are made all the more complicated when we throw in common practices found in harp writing, such as stemming or beaming notes according to which hand plays what, or changing clefs to make something easier to read.
It goes without saying that you should have a basic understanding not only of music theory, but also of standard music notation practices before you undertake publishing a professional product. Fortunately there are many references you can turn to in order to brush up or ask for help along the way. As you use your notation software to produce the look you want, remember that the rules are there for a reason. Although it’s tempting to break these rules to make a passage more “harpistic,” the end result can turn into a hot mess of needless confusion for the player. Notation styles and tastes may change over the years, but the goal is always the same—to allow the performer to interpret the score with the greatest possible ease.
Help is Out There
Where to go for help with your Sibelius questions
“Notating Music for Harp in Sibelius,” by Bob Zawalich
Sibelius wizard Bob Zawalich has put together a comprehensive document outlining virtually everything you need to know about harp notation using Sibelius. Available free online at www.bobzawalich.com/harp-notation-in-sibelius/
Avid Sibelius Users Facebook group
This generally friendly forum is a place where you can ask questions and get answers from notation experts. Find it at www.facebook.com/groups/sibeliussoftwareforum/
“Scoring Notes” blog
Tutorials, reviews, and news for all the major and upcoming notation programs. www.scoringnotes.com
Keyboard shortcuts
This self-explanatory list is found in the Sibelius help center. www.sibelius.com/helpcenter/hintsandtips/Sibelius3Shortcuts.pdf
Notate by the Book
Where to go for help understanding music notation
Standard Music Notation Practices
Although published in 1963, this short guide by the Music Publishers Association is still a great, simple, and easy to understand reference. Available free online at www.mpa.org/wp content/uploads/2018/06/standard-practice-engraving.pdf
Music Engraving Tips Facebook group
A friendly forum to ask your notation questions. Find it at www.facebook.com/groups/musicengravingtips/