


Arranging is one of those survival skills every harpist needs in their backpack. Much like a hiker needs to know all the tricks to start a fire in varying environments, a harpist needs to be able to arrange and notate all kinds of music. With the proliferation of online music outlets, it’s easier than ever for harpists today to publish their arrangements. But the hand-written notation you scribble out five minutes before the gig doesn’t cut it beyond your music stand. You want your arrangements to look as professional as they sound.
Your arrangement is almost complete, but you’re stuck. You have entered the notes into Finale and added dynamics, slurs, and tempo markings, but you aren’t quite sure how to notate the special techniques that are unique to harp music. Let’s unlock those harp notation secrets and get your score ready to share with others.
Here are some specific tips for how to create scores with harp notation. The steps in this article were written using the latest version of Finale (Finale 25), but most of the following tips and tricks should also work for earlier versions.
Harp-specific notation

Glissandi: Every arranger appreciates a well-placed glissando. Thankfully, adding the harp’s signature move is easy with Finale.
- Open the Smart Shape Palette by selecting Window ➝ Smart Shape Palette from the main menu
- Select “Glissando Tool”
- Double click the note where the glissando starts and release on the note where the glissando ends
- Select and drag either end of the glissando to change the length or angle. Click in the middle of the glissando to move the whole object

Harmonics: Like flowers, harmonics are rarely found alone. But you don’t have to manually create a harmonic mark for each note. As with any articulation, instead of selecting each note individually, you can click near the first note and move the cursor to apply the setting to the whole passage.
- Select the Articulation Tool from the Main Tool Palette
- Select a note or chord
- Select the harmonic symbol (#21)
- Choose “Select”

Or, for an even faster way:
- Select Articulation Tool
- Press “o” while clicking the note that should have a harmonic
Muffles: Fonts tell stories. They can convey moods and emotions. But did you know that they can also convey harp notation?

- Select the Expression Tool
- Double click the note nearest to where the muffle should be
- Under Miscellaneous (or another category), select “Create Expression”
- Change the font to “Maestro Percussion”
- Change the font size to 36
- Type “P”
- Add a description: “Harp Muffle”
- Select OK, followed by “Assign”
- Choose the Selection Tool on the Main Palette then select the harp muffle and drag to position it correctly
- For a double muffle, insert the symbol again and position as desired


Single Note Muffles: Space is an important part of music, and it is good to notate muffles, even for individual notes. I’m reminding you of the importance of muffles before you see how many steps it takes to create a single-note muffle. Perhaps future versions of Finale will have a simple click for this feature, but in the meantime, this is the best way to do it:
- Change your active layer: in the lower left corner of the screen, click on “Layer 1” and switch it to a different layer (see below)
- Enter a whole note in the measure where you would like the muffle to appear
- From the main menu, go to Window ➝ Special Tools Palette
- Select the “Note Shape Tool”
- Double click the whole note
- Choose figure #79 (the shape of a single-note muffle)
- Under the Special Tools Palette, select “Note
Position Tool” - Drag the whole note to the proper location
- Return to Layer 1 to keep working

Enharmonic Spellings: Many fascinating passages use enharmonic notes. Think of Renié’s Legende or Caplet’s Divertissments.
In Finale, if you want either consistent sharps or flats for notes with accidentals, you can change the default setting by selecting from the main menu: Finale ➝ Enharmonic Spelling ➝ Favor Sharps (or Favor Flats).
But suppose you want to write out a two-handed trill using B-sharp and C-natural. Enter all the pitches as “C.” While in Speedy Entry mode, press “9” on your keyboard for the notes that should be B-sharp. Pressing “9” changes the spelling for chords as well as individual notes. For chords, keep pressing “9” until you see the correct spelling for all of the notes.
Pedal Charts: In my recent publication Caterpillar Classics, I chose not to include pedal charts, as I feel it is better for students to choose places for pedal charts and write them in by hand. However, pedal charts can be useful, especially in notating the particular set up for a glissando. They also help clarify the initial set up for a piece when it is different from the key signature, so it’s helpful to know how to do them in Finale.
- Select the Expression Tool
- Double click any bar in the score
- Pedal charts are best stored in their own expression category. To create one:
a. Select “Edit Categories” in the lower left corner
b. Select “Expressive Text” followed by “Duplicate”
c. Name your new category “Harp Pedal Diagrams”
d. Select OK - With the Expression Tool selected, double click the score in the place where you would like the diagram to appear
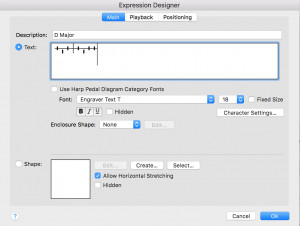
- Select “Create Harp Pedal Diagram”
- Unselect “Use Harp Pedal Diagram Fonts
- Change the font to “Engraver Text T”
- Change the font size to 18 (or slightly larger)
- Type using the following characters: (For example D Major = OpOPOpOO)
• o = flat
• O = natural
• p = sharp
• P = separator - Name your pedal diagram: e.g. “D Major”
- Choose OK, then “Assign”
- For subsequent pedal charts, instead of choosing “Create Harp Pedal Diagram,” click the existing pedal chart and select “Duplicate” followed by “Edit”

Pedal Changes: Isn’t it nice when you see an orchestral score for the first time and discover that the pedal changes have been notated? You can make harpists smile when they first see your music by notating the pedal changes in Finale.
- Open the Document Options dialog box: from the main menu, select Document ➝ Document Options
- Select “Text” from the list on the left
- On the right, in a section called “Text Insert Symbols,” change settings to the following:
• Font size: 200%
• Baseline shift: 34%
• Tracking before: 200 ems
• Tracking after: 0 ems - Click “Apply Settings to All Symbols” (just below the settings)
- Select OK
- Select the Text tool in the Main Palette
- Double click the place in your score where you would like a pedal change to appear
- Enter your note name and accidental. (For Windows users, use Control instead of Command.) As an alternative to the keyboard shortcuts listed below, you can also select (from the main menu) Text ➝ Insert ➝ Sharp (or Natural or Flat)
• Command+Shift+S = Sharp
• Command+Shift+F = Flat
• Command+Shift+N = Natural

Rolled Chords: Rolled chords are a harpist’s bread and butter, and so you’re likely to use them liberally in your arrangements. Like harmonics, the articulation “rolled chord” can be applied to a whole passage at a time. Create the roll so that it starts with the lowest note head and ends with the highest note head, rather than ending where the stem ends.
- Select the Articulation tool
- Single click the chord
- Select “Create”
- Select “Main” (top left of the Articulation Designer box)
- Scroll down to select the rolled chord symbol: #103
- Click “Handle Positioning” towards the bottom right of the designer box. Change the Horizontal positioning to: -0.1. This will place the rolled chord to the left of the note rather than on top of it.
- Check “Copy the Main Symbol: Vertically,” as this will allow you to adjust the height of the rolled chord symbol
- Click OK
- After adding the rolled chord to your note, adjust the length and position of the rolled symbol by dragging the box attached to the bottom of the roll either up or down


Beaming and Stem Direction: Beaming and stem directions can indicate which hand plays particular notes. They play a large role in making passages easier to read. Who hasn’t dealt with the frustration of sorting out an otherwise easy passage of music that is poorly beamed and stemmed? Here’s another chance to win brownie points with your fellow harpists.
- In Speedy mode, select the note after the break or join you would like to create
- Press “/” on your keyboard to separate notes into two beamed groups or to join separate groups together with one beam
- Press “l” on your keyboard to reverse the direction of the stem
Making it look nice
Note spacing: In general, Finale does a nice job with note spacing, but sometimes passages containing a variety of rhythms are awkwardly spaced. For any passage, select the measures. From the main menu, select Utilities ➝ Music Spacing. From here you have three options:
- Apply Note Spacing to Current Part/Score
- Apply Beat Spacing to Current Part/Score
- Apply Time Signature Spacing to Current Part/Score
Experiment with these three options and choose the best one for your passage.
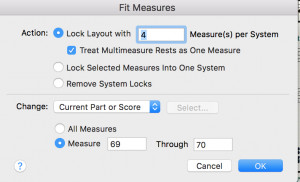
Measure spacing: Suppose Finale places six bars on a line and it would look better spaced with just four bars on a line. From the main menu, select Utilities ➝ Fit Measures. The “Action” section lets you choose how many measures you would like per line. The “Change” section allows you to specify which part of the score to affect. You don’t have to select the exact measures in advance as you can specify them on this screen. A small lock icon will appear to the right of bars that have been locked with a particular number of measures.
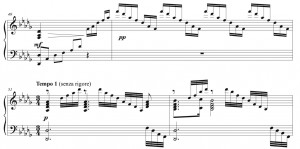
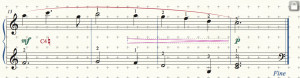
Hiding Objects: Not everything is as it appears. Being a software program, Finale only does what it is programmed to do, and it is as good as a metronome at counting rhythms. But its counting is accurate to a fault. If the time signature is 4/4, Finale will not allow you to add any more notes, and it will add rests for any beats you leave out. So how was the following example created?
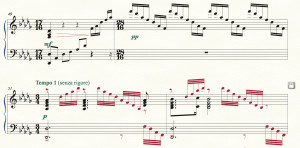
The answer lies with hiding notes and time signatures. Below is the same example in Finale. The lighter color indicates hidden notes, and the red notes indicate that they are in Layer 2.
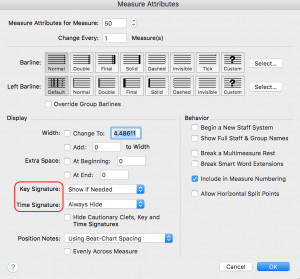
To hide notes in Speedy Entry mode, simply select a note or rest and press “h.” The note will turn a lighter color and will not display when the music is printed. To hide time signatures or key signatures, follow these steps:
- Select the measure tool
- Double click a measure
- Change the setting for Key Signature/Time Signature to “Always Hide”
When there are a lot of hidden notes, the Finale score can start looking messy. In order to see what the score will look like when printed, select View ➝ Show ➝ Hidden Notes and Rests. If the notes were previously showing, that option will now be unchecked and your notes disappear. Magic!
Final touches
It is now time for a few final edits that will make your score look professional.

Instrument Abbreviations: Do you really need to notate “hp.” on every line of a harp solo? Unless the performer of your music is Harpo Marx, they probably plan to stick with the same instrument for the entire piece.
To delete the instrument abbreviation, select the instrument name, and double click the box that appears in the upper right hand corner. Uncheck “Show Group Name.”
Even Spacing: To create consistent formatting, first have Finale show a grid: View ➝ Grid/Guide ➝ Show Grid. You may also want to select “Snap to Grid” depending on what you are moving: View ➝ Grid/Guide ➝ Snap to Grid.
When you select and move an object such as a dynamic or expression, Finale shows a vertical and horizontal line depicting the object’s exact location. With the grid showing, you can now position all of your objects consistently.
Next, edit your page margins with the Page Layout tool selected, choose Page Layout ➝ Page Margins ➝ Edit Page Margins.

Now for one of my very favorite tools—“Space Systems Evenly.” After adjusting the page margins, your systems will likely not be spaced evenly. With the page layout tool selected , choose Page Layout ➝ Space Systems Evenly. Now that is a professional looking score.
Page Layout and Design: If you are writing a collection of music rather than a single piece, I recommend using a separate program for page numbers and copyright notices. Layout and design programs are better set up to format lengthy publications. I used InDesign to do the page layout for Caterpillar Classics. Other similar products are QuarkXPress, LaTeX, or Scribus. The benefit of using another program is that if you decide to rearrange the pieces or add music, the page numbers can automatically update. Also, in choosing a particular design—font, placement, etc.—the styles apply to the entire document, saving the work of adjusting each piece individually.
The grand finale
As you become more familiar with Finale, producing scores will become easier and faster. Have fun cranking out your nicely notated, professional looking scores. •
Help is out there
Keyboard shortcuts save you a lot of valuable time in Finale. In addition to the ones mentioned in the article, there is a valuable shortcut cheat sheet available at jameskass.com/finale/ Finale_Keyboard_ Shortcuts.pdf. For questions that crop up while you’re working on an arrangement, check out Finale’s excellent forums at finaleforum.com. Also, from the main menu of Finale, selecting Help 2 User Manual will bring you directly to the specific manual for your version of the program.
Stay tuned for Sibelius
Never fear, Sibelius users, we haven’t forgotten about you. Look for an article on Sibelius notation secrets for harpists in an upcoming issue of Harp Column.