


Focus on what you’re doing, what your teacher says and does, and how to adjust your playing according to your teacher’s feedback—an ideal harp lesson. In real life, however, it’s easy to get distracted, not write a cue in your music, or blank on something important your teacher says. It’s easy to not have enough information from your lesson to direct your practice sessions.
In an academic class in college, few people succeed by simply listening to a lecture. Most take notes—they transcribe (or at least try to do this) verbatim, use Cornell Notes or a similar method, or write on handouts of the lecture slides. After class, the committed student organizes their notes and refers back to them to complete assignments or study for an exam. Stronger notetakers generally have more success in class.
It’s the same for students of an instrument. Complete lesson notes will jog your memory, improve your ability to prioritize, and aid in tracking your progress across time. Of course, during a harp lesson, it’s impossible to straddle your harp while juggling a notebook. To pull off the full benefit of lesson notes, you need to employ a systematic approach for recording, organizing, and studying.
Guiding principles
Principle 1: Human memory is flawed. Some people believe they will recall every detail of a lesson. Neuroscientists and cognitive psychologists suggest otherwise. Our memories are susceptible to distortions, biases, and a host of other confounding factors. When fully engaged in a lesson, our working memory is consumed and therefore cannot attend to every detail. Productivity guru Dave Allen famously said, “Minds are for having ideas, not holding them.” Applied to music lessons, your brain should be focused on music and instruction rather than on retaining comments or action items for later practice.
Principle 2: Lesson notes document your behavioral patterns and progress. There is value to tracking the number of times an instructor gives feedback about one technical issue. The same for their positive feedback the first time you grasp something: “Wow! That was a great trill—you stayed close to the strings and minimized wrist movement to achieve that speed.” Lesson notes track these sorts of details while keeping you honest. How many times this semester were you unprepared for a lesson? The notes don’t forget, even though sometimes we do.
Principle 3: Audio or video recordings of lessons are invaluable when used correctly. Have you ever been stuck on a tricky passage, and in just a few seconds your teacher’s instruction and feedback fixed the problem? Master teachers can break down technical problems and shape correct performance, and a video or audio recording of the lesson can capture that feedback or the series of steps you took to move from an errored performance to a correct one. During practice, you can use these recordings to summon and analyze such moments—how you were guided through the problem as well as any useful sayings or metaphors your teacher said that changed your thinking and playing.
With these three principles in mind, we can explore a note-taking method that beats faulty memory, tracks behavioral patterns and progress, and obtains the most information possible from a lesson recording.
Before we get into how to take notes, let’s examine the necessary upfront steps.
Preparation and recordings
Seek permission to record the lesson. Most teachers understand the purpose of good notes and a video or audio recording. But you have to ask. “I was wondering if I could video or audio record our lessons. You give such valuable advice and feedback, but I can’t always recall what helped me in the lesson. I plan to review each recording the day after my lesson, take notes, and create a practice plan based on it. I won’t share the recording with anyone else. Would that be okay with you?”
Some teachers might be fine with an audio recording but not a video, or with recording a segment but not the entire lesson. Take what you can get and reiterate your plan to use the recording after the lesson ends. Once you start writing lesson notes from a recording, occasionally share them with your teacher to illustrate how functional they are.
If your teacher responds with a hard no, you can still follow some of the steps in this article, albeit modified since you won’t have a recording to rewind and pause.
For teachers reading this article, consider how your students can benefit from recording and reviewing their lessons. If you can get past your hesitations, try implementing this note-taking strategy with your students, as this will give you control over what is recorded and how any recording is used.
Select the right equipment and note-taking tools.Once you get a teacher’s blessing, select a device that records for accuracy and quality. Something with decent enough sound to make listening back bearable. Poor phone recordings (without an external mic) might prove useless. This takes trial and error, so test a few devices over several lessons.
Recording technologies are constantly advancing, so try before you buy. Do a quick online search for the latest (and most affordable) devices. Read reviews and product comparisons. Order one to try out and return it if you aren’t completely satisfied. This is an important investment. As part of your research, ask other musicians what they recommend—which external microphones or recording devices they like. Might they loan out their device for a lesson or two? How easy is it to transfer files to a computer or phone?
You will also need a pair of headphones that maintain original sound frequencies. Sometimes these headphones are called neutral, mixing, or reference headphones, and they are the best for hearing the nuance of harp playing and speaking. A less expensive option is a software like SoundID Reference, which calibrates frequencies based on headphone brand to produce the best sound. Technology in this area, too, is changing rapidly, so you have to do the research.
Did you write that down?
Otter.ai is voice-to-text transcription software that uses artificial intelligence. It uses an AI algorithm to transcribe spoken words, either live or in a recorded file. Otter.ai has a desktop application, as well as a mobile app. It identifies different speakers and includes time stamps within the transcription for reference. There are many apps that provide similar services to Otter.ai that can be found with a simple internet search. Otter.ai is not a paid advertiser, but is a service used by this article’s author, Adam Hockman, as well as the Harp Column editorial team.

Besides a recorder and headphones, you’ll need a reliable note-taking platform. You can write something out by hand, but a digital format can quickly organize and sort your notes across months/years, catalog repertoire, and document your growth with technique. It’s also easier for making edits and changes along the way. Then, a voice recognition app like Otter.ai (see description to the right) can record audio, transcribe notes, match the notes to the recording time stamp, and generate summaries. A tool like this does half the work so you can direct your time to consolidating information, reflecting on it, and planning your practice.
It’s a good idea to choose your recorder, headphones, and note-taking tool at the same time and learn how they’ll work together. Compatibility is key. For a transcription or AI-based tool to function with accuracy, it must have clear audio inputs, so part of your learning will entail adjusting recording levels and device placement.
Establish a routine for preparing your recording supplies and scheduling debrief time. Keep your recording device and other supplies in the same bag, and set a reminder on your phone to charge the device before each lesson. Your equipment must be with you, charged, and with enough storage space to record the lesson.
Also schedule debrief time after the lesson to review the recording:
- Schedule the debrief the day after your lesson but before the next practice session.
- Dedicate a block of time that is twice as long as the recording length. (With practice, you’ll become fluent at note-taking and need less time.)
- Find a quiet space where you can review the recording without musical or other distractions in the background.
Document a pre-lesson pulse check. Before you enter the studio, record a few observations about your mood, energy, excitements, worries, distractions. Have you received bad news or had a fight with a friend? Did you have a poor night of sleep? Such events affect the outcome of a lesson, so document them. Use a notes app or audio memo function on your phone to record these observations. During the debrief, you will include them in your note-taking spreadsheet (see Tab 1, below).
At the studio, find a spot for your equipment and record the lesson. Learn to use your equipment before you enter the studio so that you can set it up quickly and unobtrusively. Place the device in a location that captures the best sound (playing and speaking) and adjust it with each lesson. If you record a video, find an angle that shows both of your hands and the pedals. If your teacher is comfortable being in the video frame, try to grab a view of their hands and pedals. This way you can review moments when they modeled a movement on the instrument and compare that to your own performance. Follow the teacher’s lead for how much or little to show in a video. If your device has a built-in microphone, make sure it isn’t up against an object or cloth that impedes sound. A tabletop tripod might be a useful addition for video and audio recordings.
Immediately after the lesson, document another pulse check and audio note summary. The lesson recording will capture what was played and said during the lesson, but it won’t include your private thoughts and feelings. You might have been thinking about something that could be helpful for practice, items on your to-do list, or how a teacher’s comments made you feel. Take a moment to record those thoughts and how you felt about the lesson.
Having successfully recorded a lesson and your pulse checks, you can move on to note-taking.
The debrief
At your first debrief session—a block of time that is twice as long as the lesson recording—start populating your note-taking spreadsheet. You will organize and summarize the information from the lesson recording, including highlights from the Otter.ai transcript (if you’ve used this app). Remember: spreadsheets allow for easy editing and sorting across dates and repertoire.
Your lesson note spreadsheet might include two tabs:
Tab 1—Info: could hold lesson-day information: date, time, location, attendees, before- and after-pulse checks, preparation and reminders, big ideas and takeaways, and action items and other follow ups.
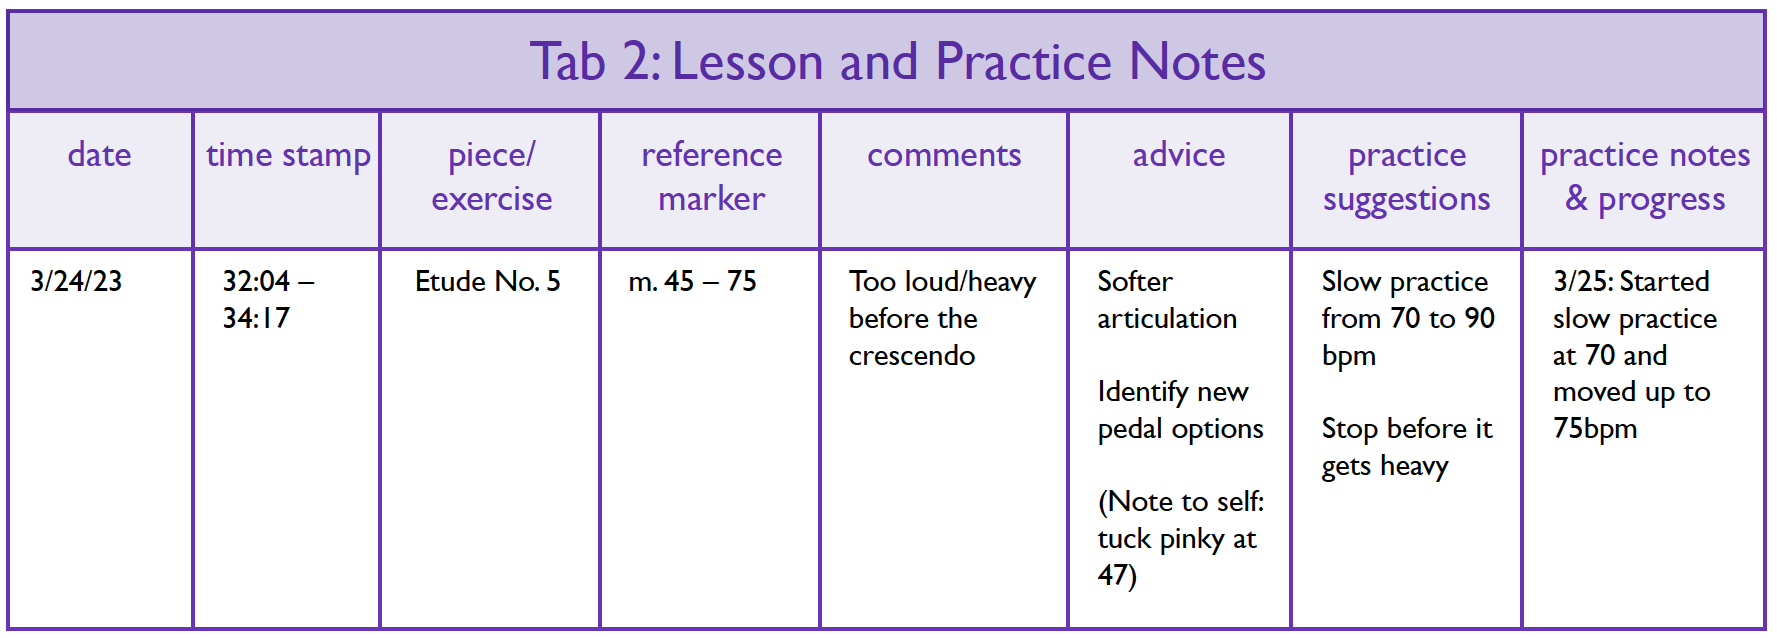
Tab 2—Lesson and Practice Notes: could be the place for item-specific notes and assignments: date, time stamps, piece or exercise, reference markers, teacher comments, advice, practice suggestions, and practice notes and progress.
Lesson note spreadsheet: A well-organized spreadsheet allows you to organize, summarize, and track over time the information from your lesson recordings. Below are examples of what two tabs of your spreadsheet might include. (Click to enlarge.)
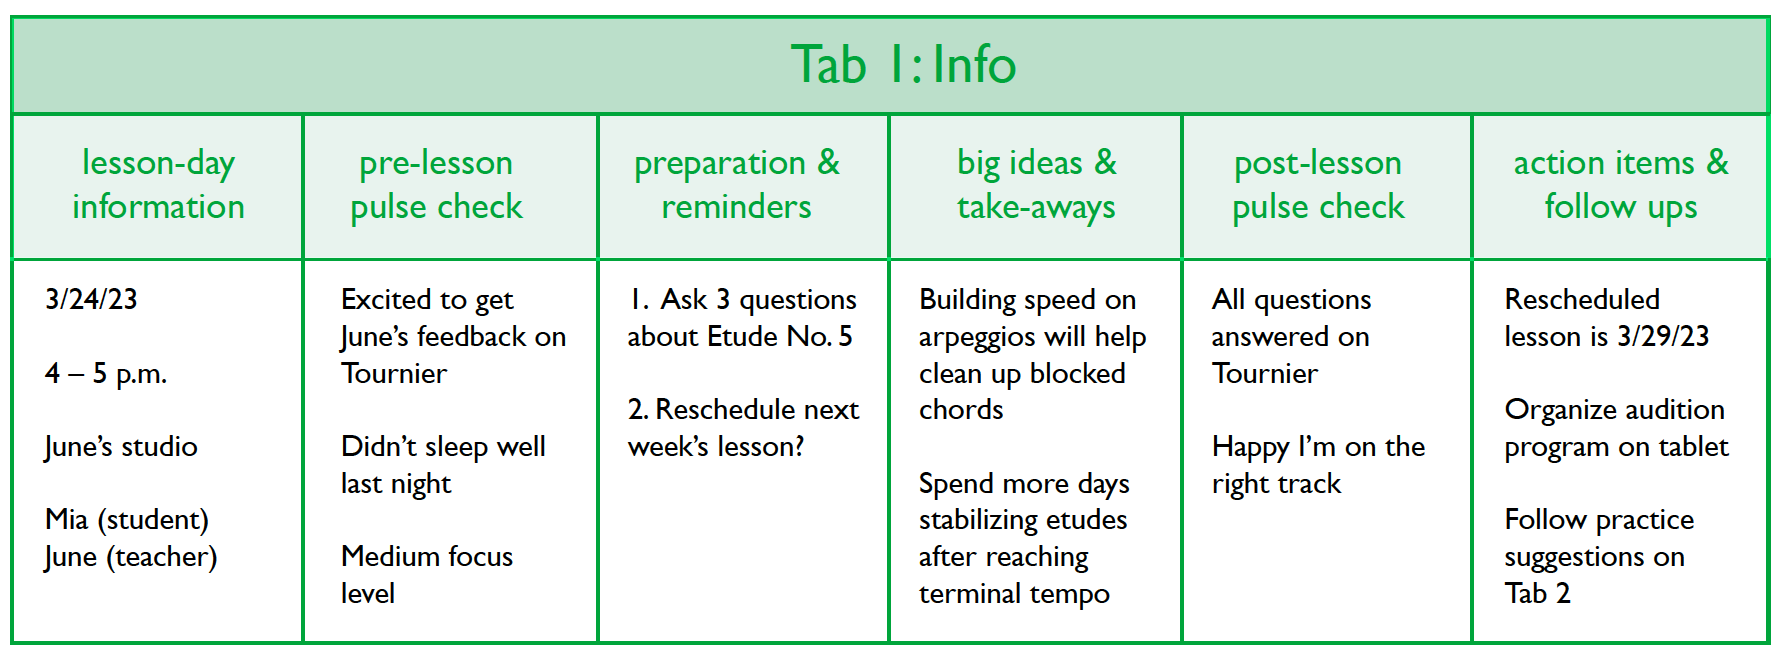
In Tab 1—Info (see table above) fill in the first rows as follows:
- Column 1—Lesson-day Information:Date, time, location, and attendees (teacher, yourself, collaborator, like a pianist, etc.).
- Column 2—Pre-lesson Pulse Check: Summarize your before-lesson pulse check using short bullet points.
- Column 3—Preparation & Reminders: While reviewing the recording of your lesson, note questions and follow ups to address at the next lesson. List what you need to take to the lesson. You’ll refer to this row throughout the debrief and at the next lesson.
Next, dive into the Otter.ai recording to add item-specific notes and assignments to Tab 2. Most lessons involve work on several items: a scale, an etude, or perhaps sections from three assigned pieces. For each of these items, record the following information:
- Column 1—Date
- Column 2—Timestamp: Where in the lesson you start playing the specific section (e.g., 4-min, 30-sec). Otter.ai and other recording apps automatically add time stamps to the transcript to align text with audio or video.
- Column 3—Piece or Exercise:The piece, movement, or etude you are playing (e.g., Tournier’s La Danse du Moujik).
- Column 4—Reference Marker: Where in the music the teacher provides direction or feedback (page, line, measure numbers). Be as precise as possible.
- Column 5—Teacher Comments: The feedback your teacher provides on that section (change dynamics, adjust fingers or wrist movements, add new pedaling, etc.). Document positive and constructive comments.
- Column 6—Advice: What you need to start, stop, or continue doing in order to resolve the identified issue or achieve the goal (e.g. jump between blocked chords faster).
- Column 7—Practice Suggestions: Practice techniques or strategies to improve your performance (e.g. Practice arpeggio runs increasing speed and using varying rhythms. Build up speed until 115 bpm).
- Column 8—Practice Notes & Progress:Throughout the week as you practice this section, make notes in response to reflection questions like, How did practice go on that section? Did the practice suggestions work? How much did I progress?
- Here is an example of what all of this might look like in a note-taking spreadsheet.
Transcription of feedback for Etude No. 5: In measures 45–75 (reference marker), it’s too heavy (constructive comment). See the dynamics there? Go for softer articulation before the crescendo to carry the line and let’s look for a new place to change pedals (advice). Only practice these few measures in that section, starting at 70 beats per minute and work up to about 90 beats per minute before our next lesson. Stop increasing the tempo when it gets too heavy again (practice suggestion). Let’s check in on this next week.
As you move through each section of the recording, add rows in this fashion.
After you have finished reviewing a piece, go back to Tab 1 to summarize:
- Column 4—Big Ideas & Takeaways: While documenting item-specific notes on Tab 2, you might notice several big ideas or themes. If the advice for Etude No. 5 is focused on softer plucking and slower playing, note those key takeaways. By repeating this process for each piece you played during the lesson, you can spot any patterns in teacher feedback, that is, instructions and corrections that apply to every piece or your playing in general.
Move to the next piece or exercise in the lesson recording and repeat the steps of writing item-specific notes and assignments (Tab 2) and big ideas and takeaways (Tab 1). As you read the Otter.ai transcript, clean up major spelling or word mistakes in it. You don’t need a perfect transcript, just one with enough critical information to reference or search later on.
- Column 5—After-lesson Pulse Check:Review your after-lesson pulse check notes and summarize them in short bullet points. Reflect on them and consider whether you need to adjust your behavior for the next practice or lesson.
- Column 6—Action Items & Follow Ups: After consolidating item-specific notes in the big ideas and takeaways cell, identify action items and priorities for the week. What practice plan should you follow? Are there non-musical tasks you need to complete (pay tuition, apply to a competition)? Throughout the week, refer to Tab 2 to review comments, advice, and practice suggestions that can direct your daily practice.
Double check your action items and follow-up list. Once you’ve finished the recording and filled out column 6 of Tab 1, scan the lesson transcript to catch anything you missed. The goal between lessons is to focus on this summarized list of action items, referring back to the recording only if necessary.
From lesson notes to action
Practice and track your progress. Throughout the week, implement your practice plan based on teacher comments, advice, and practice suggestions. Update column 8 (Practice Notes & Progress) in Tab 2 with reflections on how practice went and whether your teacher’s suggestions worked or if you need to adjust them. If you get stuck, listen to your recording for a specific section.
Add to your preparation and reminders list. As you practice, new questions for your teacher might arise. Add those to your Preparation & Reminders list in Tab 1 so you are ready to ask them at the lesson. Assess the quality of your lesson recording and note in this same list any necessary adjustments to the recording levels and placement for the next lesson.
Rehearse a 1–2 minute summary of your week of practice. Before you enter your next lesson, practice rehearsing aloud a summary of your progress from the week. Verbal rehearsal helps form questions that are succinct and precise in their language. Refer to your preparation and reminders list as a guide.
Continuous improvement and monitoring
Personalize your note-taking system over time. After using your note-taking approach for three to four lessons, update it so that it works better. For example, you might decide to have a tab for each lesson or a single tab that collects all lesson details from the semester. Similarly, you might prefer to listen to the lesson recording twice—once on a walk and again at your desk. Experiment with such variations each week. But stick with it for several weeks to see the benefits.
Monitor progress and make decisions. Several weeks and months of lesson notes will reveal patterns in your behavior and progress. Every other week, take some time to review your progress and make decisions. A simple method for doing this is continue-stop-change.
- Continue: If the practice strategies and schedule you have in place are supporting your goal, continue what you’ve been doing until you meet your objective.
- Stop: If you’ve met your goal, stop practicing a piece or move from daily to less frequent practice (e.g. once a week; every two weeks).
- Change: If you haven’t met your goal, and the practice strategies or schedule you’re using isn’t working, change to a new strategy. Ask your teacher for advice or try a strategy that worked in the past for another section.
Analyze each item-specific feedback note and add any continue, stop, or change notes to Column 8 (Practice Notes & Progress) on Tab 2.
Getting started
There are several starting points for implementing this note-taking approach based on what you’re currently doing.
- If you already take notes during your lesson but don’t record the session, ask your teacher about recording it. If they are uncomfortable with the idea, create a note-taking template and schedule time immediately after the lesson to record as many notes as possible (what you can recall). If your teacher allows you to record the lesson, run through the steps outlined earlier.
- If you already record your lessons, consider adopting a digital note-taking tool like Otter.ai to reduce the time and effort of listening back to the recording. And implement the note-taking spreadsheet.
Taking notes on a harp lesson is a habit you build over time. If you have a friend who is following this approach (or interested in trying it), schedule debriefing time together when you can each work on your recordings and transcripts, if you have them.
This approach requires time and effort, but over time you will get better/faster with it, and it will certainly pay off. None of this is rocket science, but it does tap into the science of learning. This way of thinking—and doing—is an investment in yourself and your future. •