


This spring I performed Richard Strauss’ famous Also Sprach Zarathustra with the Minnesota Orchestra. The orchestra librarian kindly emailed me a clean copy of the second harp part. I replied with a note of thanks, and asked if she had a previously-marked second harp part already in their files. Fortunately they did, and I was very grateful that I inquired! There were a lot of pedals, pedal graphs, and logistical markings already in the part that I knew would save me a lot of time in my preparations.
I normally prefer starting from scratch—a new, unmarked part ready for my markings is the way I approach most types of music such as solos, chamber music, or orchestral parts. However, this Strauss part I received was different. Perhaps for the very first time in my career, I actually printed out this marked part and used the harpist’s markings both while learning the part, and while playing the concert. Of course, I checked their markings and added plenty of my own, but upon reflection about why I used this part, I asked myself “what makes a solidly-marked piece of harp music?”
Create a roadmap
The subject of visual clarity in my music and in the music that I teach is near and dear to my heart, partly because I am an extremely visual person, and I believe that “active learning” is paramount to successful teaching and learning. What do active learning and visual clarity mean, anyway?
The first step in being a successful learner is to make a clear, well-informed, and clean roadmap of any piece of music. It means inputting all markings which will help our learning process, and which will activate good active learning skills. It means drawing in markings that not only help our visual acuity, but also our aural, tactile, and intellectual acuities. A well-marked score is the first step to a focused learning process and in turn, an investment towards a solid, focused, and consistent performance of the piece.
University of Michigan Professor Emerita Lynne Aspnes shares, “Clear and consistent markings are a key component in the learning process. The complex eye-to-hand coordination skills required to read, process, and transfer information from the page to the hands and feet simultaneously has to be the priority.” Twin Cities teacher and professional harpist Jann Stein likewise values visual clarity. “For every gliss pattern that has a change of pedals, we need to know instantly what the pedal setting is,” she says. “Along with this change of pedals, I circle the notes in the diagram that need to be changed. Doing this helps me to visually recognize any patterns.”
The first step I take in making a roadmap of a piece is making sure the music is large enough for me to see and mark. Amy Nam, Instructor of Harp and Composition at Luther College, adds, “Fingerings are probably the most important to me. The brackets help my brain quickly parse the notes (especially if there are a lot of them!) so I can place my hands without hesitation.” Stein agrees, “I encourage students to work on learning their music from the beginning using the brackets. It’s much easier to play passages smoothly if you place the bracketed finger passages as a unit, rather than single placing your melody or bass line. One good way to learn your fingering is to go through and play all the bracketed spots as a solid chord. You could do this for particular sections giving you the problem, or measure by measure, or line by line.”
Do your homework
Before starting to learn a piece of music, challenge yourself to notice every detail within it. Here are suggestions for where to start making your roadmap:
- Copy your clean score before marking. This way, when you are far enough in the learning process, you can read from the clean score to quiz your learning and retention of your intentions.
- Notice key, meter, tempos.
- Notice texture, intervals, chord shapes.
- Notice the form of the piece, and which beats, measures, or material repeat.
- Notice the direction of chords, texture, and direction of melody. Make a note about ascending or descending passages, whether melodic or arpeggiated figures.
- Recognize where accidentals are and which pedals or levers you will need to change. I suggest boxing these, or highlighting them on your music in order to make them stand out from the rest of the print and notes.
- Mark your key changes.
- Circle your meter changes.
- Find and understand any rhythms that may be challenging.
- Figure out some preliminary fingerings. They should help your eye recognize the direction of the melody or music and prepare your hand to move to where it needs to go next.
- If necessary, write in subdivisions for the correct pulse in challenging sections, especially if there are numerous types of rhythms in the music.
- Don’t let beaming fool you! Some pieces are printed with beaming that doesn’t necessarily fit how you may play the piece. Some of the time, fingering or playing between hands is more simple than it looks on the page. Be sure to clearly mark these.
Making a roadmap of a piece of harp music includes marking pedal graphs at all major key changes, phrases, or systems of music (if the part is exceptionally complicated), marking fingerings that aren’t completely sight-readable, and ensuring easy and well-planned page turns, for example. It means marking all measures of rest and making plenty of cues in chamber or orchestral music. If the score is visually solid, the other aspects of active learning fall into place and foster a successful learning process. It means that we should mark enough on the music, about the music, so that we begin to both see and hear phrasing, direction, and nuance even before we start learning the notes.
I find that marking in some music theory (analyzing chords or phrase structures, for example) and analyzing the form both helps inform my learning process and enhances my performance of the work. This also helps if I am performing a piece memorized. I only feel confident going into a performance if I have done all my homework on the piece or part in these ways. See Ex. 1
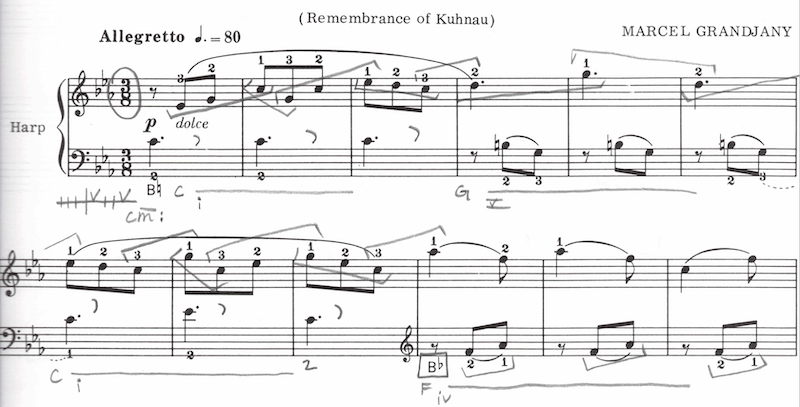
Ex. 1: “Gigue” from Petite Suite Classique by Marcel Grandjany
Note the brackets to indicate clear directional fingering, and chord indications for easy analysis and phrase form.
Avoid construction
If visual aspects of our markings are clean and clear, this eliminates the need to clean up “construction” along the way that could harvest sloppy learning. Construction cleanup work may come from poorly or inconsistently marked pedals or fingerings. Let’s be honest, at some point, haven’t we all accidentally marked two separate fingerings within the same passage that occur at different parts of a work?
I asked Heather Cornelius, doctoral candidate at the University of Minnesota, what the first thing she does to a piece of music before she starts learning it is. “One of the first things I do is play through it slowly and add markings for pedal changes, along with frequent pedal diagrams. For passages that don’t fall naturally in the hands (for example, music with a lot of turnarounds, crossings, wide intervals, or awkward chord shapes), I also try to mark fingerings fairly early on. I’m open to changing my fingerings, though, if I find one that sounds or feels significantly better.”
Aspnes offers a word of warning within constructing our markings. “I can imagine two instances where how we mark and prepare parts may not align with that need,” she says. “One would be when we are asked last-minute to drop into an ensemble; the markings we have carefully honed over many years may be so specific and ingrained in our muscles that they interfere with our ability to go with the flow of a new interpretation. The other situation could be with a newly composed work with a long solo preparation period and a very short rehearsal period. It’s easy to fall into patterns of marking music that inhibit our ability to be resilient in the moment.“
Stein highlights the importance of being consistent with pedal markings. “Write in all pedal markings,” she says. “If pedal markings are already printed in the music, you might want to change the order that they’ve been written. Some put left foot on the top, right foot on the bottom. Be consistent on that. I prefer having the right foot on the top, left foot on the bottom. The order might also need to be changed in which you change the pedals.”
In the United States, I notice that most harpists mark their pedal graphs with a vertical line–one for each pedal. When I studied in France, I learned an alternative method to writing pedal graphs. The chart in Ex. 2 on the facing page compares the visual aspect of writing pedal graphs with either circles for each pedal in flat or sharp, or, with a right side up or an upside down “v”. Ever since that year abroad, I have marked all of my pedal graphs using the “v” method because to me it is much more visually clear, especially at a quick glance within orchestral or chamber parts. Alongside multiple pedal graphs and sections of music, my eye more quickly differentiates the “v” graphs rather than vertical dashes (or the circle). Whichever method we choose, consistency and visual clarity is the key to success within our learning process.
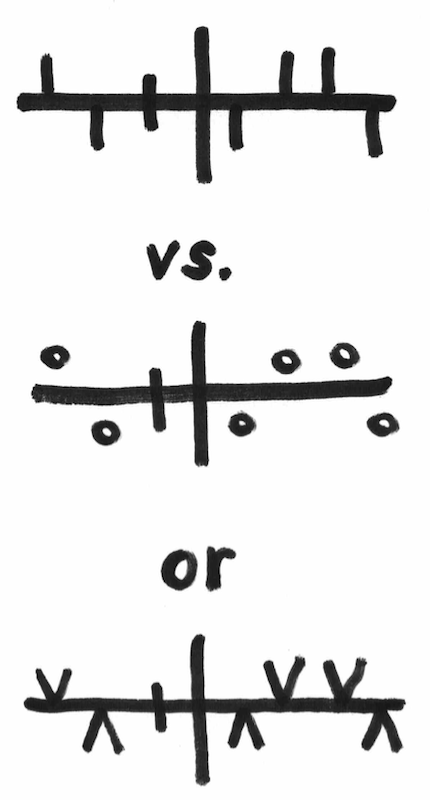
Ex. 2
Examples of different ways to mark pedal graphs in your music.
Helping students
While we might leave room to change our minds about an initial marking we put in our music, when working with students, we must take the time to mark aspects correctly and consistently. As teachers, most of us have experienced a student changing a fingering on their own but not marking the change in their music. Cornelius adds, “Marking pedals and fingerings early on makes both muscle memory and visual memory easier and more secure. Whether students are performing from memory or with the music, consistent repetitions help their feet, fingers, and mind to know what to do and when to do it.”
Kathy Kienzle, Associate Faculty at University of Minnesota and former Minnesota Orchestra principal harpist, takes on a detailed approach to teaching students about marking their music. “For a young student who has been playing for a year or two, I like to give them very easy pieces that don’t have fingerings or placings marked in,” she says. “I ask them to mark the fingerings and placings and we then discuss their choices, and how the fingerings and placings affect the sound musically, rhythmically, and technically.” As students progress, this process should become easier and more fluent. She adds, “For older, more advanced students who are playing standard harp works, I loan them my markings which are often from my teachers, Marcel Grandjany or Susann McDonald, for example. For the most advanced students who are often doing their own transcriptions, I expect them to start to choose fingerings and pedalings, and we then discuss them and work on them in their lessons.”
It is important to differentiate between standard notation and harp-specific notation with students. Aspnes offers, “It’s important for the student to learn from the beginning the distinction between standard musical notation language and harp specific notation. Students will absorb the former from an early stage as so many notations are included in printed musical scores. Absorbing the harp specific notational symbols, and understanding their originations and applications in (solo) harp repertoire generally requires a longer timeline and a deft hand from the teacher at assigning repertoire and sharing their well-researched knowledge of harp notation traditions. Ultimately, the goal is for the student to understand and be able to contextualize how a marking influences the music.”
Part of our job as instructors is to teach students how to teach themselves. When we teach music, we simultaneously are teaching students how to practice. I approach every lesson this way. I will say to my students, “Describe to me how you are going to practice this passage,” and then we will talk about it and walk through the active learning process of learning music well from the very beginning. Part of the process of teaching students how to practice (and ultimately teach themselves), is to be as detailed as possible in our teaching methods.
Nam notes, “I often use colorful markers to mark the music of my younger students, because doing so makes the markings both fun and very obvious. Encouraging the student to use a color system to highlight markings already in the music can also be extremely helpful. One thing I absolutely don’t let my students do is write in note names, because this completely circumvents the learning process of associating the symbol (the note’s position on the staff) with the physical place on the harp. I also find that beginner students will secretly rely on the finger number instead of the note name if there are finger numbers written in for every note, so I also avoid that. After they’ve learned to read comfortably, I encourage writing in finger numbers.”
Aspnes shares, “I tend to follow the students’ lead in marking their music. I gauge the effectiveness of our choices (choosing to use lots of notations, fewer notations, colors, or not, adding transparent or removable stickers) and if I have to reevaluate how we’re marking music by how resilient and reliable the student is in performance.”
Almost always, sloppy and inconsistent markings lead to hesitations, mistakes, and incorrect notes–and in return, inconsistency in preparation and in performance. My goal is to draw in both effective and efficient markings, and I teach my students to do the same all throughout the learning process.
Traveling solo
Some composers, like Marcel Grandjany or Carlos Salzedo, leave copious amounts of instruction for the performer. Seemingly every fingering, dynamic, articulation, and phrasing is already in the music. Of course, this doesn’t mean that we can’t put our own markings in, but it does make for an already complete blueprint of the composers’ intentions in their music. See Ex. 3

Ex. 3: La valse dans le bois for harp solo by Rachel Brandwein
Marking phrases and slurs makes musical sentences clear and helps with interpretation.
Other harp music is sparsely-marked, at best. When I receive a piece of music with rare markings in it, one of the first things I do and teach my students to do is mark the phrases and slurs. A phrase is a musical sentence; without phrase markings, it’s like looking at a paragraph of text with neither periods nor other punctuation. I firmly believe that phrasing helps guide our eyes to large aspects of the music, like form, and to notice even small details like articulations (slurs, accents, etc.). For some reason, there is a lot of harp music printed (especially by non-harpists) without phrase markings. I believe these are essential in understanding the music. These phrase markings operate the same way in ensemble music. See Ex. 4

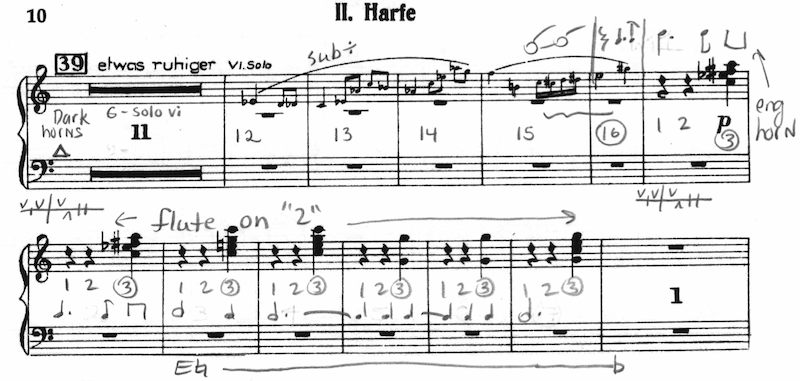
Ex. 4: Symphony No. 2, Movement III, Harp 2, by Gustav Mahler
Note the phrase markings to aid visual recognition of patterns. Also note the instrumental cue and Harp I rhythm.
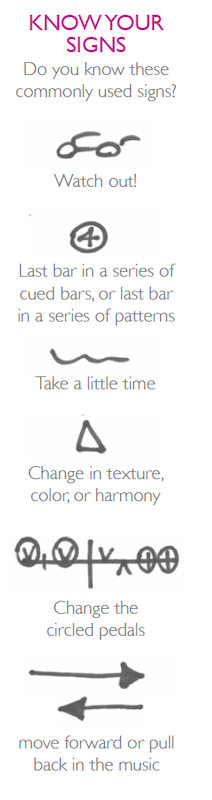
Cornelius likes to use visual words to help her interpret her solo works, and marks these as creative reminders during her learning. She shares, “In solo parts, I like to use one- or two-word cues related to musical intentions. For example, I might remind myself to play with a ‘full,’ ‘warm,’ or ‘clear’ tone, to bring out ‘more bass,’ or to ‘crack’ a quickly rolled chord. I also use a squiggly horizontal line to represent taking a little time, and a forward arrow to represent moving ahead.” See Ex. 5
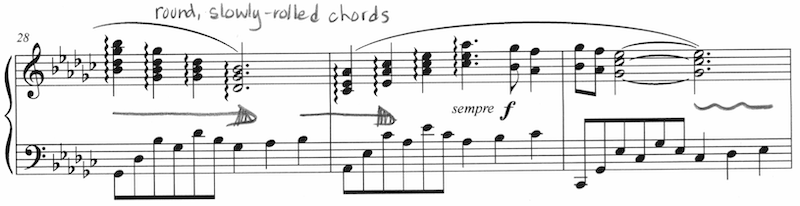
Ex. 5: La valse dans le bois for harp solo by Rachel Brandwein
Use simple visual cues to help interpret your music, such as description words, arrows to indicate moving ahead, and a squiggly horizontal line to show where to take time.
Traveling in groups: chamber music & orchestral parts
Ensemble music has its own set of signs we need to clearly indicate. Marking orchestral scores can be a large feat in itself. As harpists, not only do we frequently have some, several, or hundreds of measures to count, but our orchestral harp parts often serve very different purposes from one composer to the next. The purpose of our parts may be percussive, or it may be melodic. It may serve as more harmonic support, or it may simply add tone color within the ensemble.
Aspnes points out the dangers of potentially over-marking our ensemble music. “Reading markings can, at times, take our attention away from delivering what we’ve practiced, listening to our colleagues, and playing with the ensemble…I focus on the basics as much as possible. Consistency, especially with (marking) the essentials, can go a long way towards developing strong reading/processing skills, which is a huge bonus when we have to deal with the many variables inherent in playing music.”
Nam comments on the importance of marking rhythm, cues, and muffles. “In orchestra, I write in the rhythm counts in many places, even when the rhythm seems really obvious, so that my brain can easily interpret it while in a high-stress state. In orchestral and chamber parts, I also mark in reminders to look up at the conductor or another musician for tempo cues. I am a bit more obsessive about marking in muffles in solo music than in ensemble.”
Cornelius’ approach makes for a rock-star performance. She notes, “For chamber and orchestra parts, I make sure to write in measure numbers before the first rehearsal. I also add eyeglasses and cues, noting which instrument is leading. If I play an ostinato for several measures, I number them and circle the last number to signal the change. During a long tacet, I like to mark cues to confirm my counting is on track. For example, for an 18-bar rest with a prominent oboe part beginning in bar 9, I write ‘9-ob.’ in my part.” Kienzle approaches chamber and orchestral scores similarly. “If everything looks playable, I would also check the score, in the case of an orchestral or chamber music work, to see how the harp part fits with the res,” she says. “In both chamber and orchestral pieces I would mark other instruments’ parts into my part, either as cues during rests, or if I am accompanying another solo instrument, I would write the rhythm of the solo part. I would also mark whether the harp part is more exposed, in an orchestral work, or a solo part, in a chamber work.”
Literally hundreds of thousands of notes, or more, are being played right around us, and we must have rock-solid focus, and rock-solidly marked parts. The number one reason I may lose focus while performing in a large ensemble is because my part isn’t clearly marked. Throughout my years of playing, I’ve continued to hone my approach and learned through trial and error, and, thankfully, losing focus now rarely happens. But I’m always finding ways to improve.
In ensemble parts I often mark the rhythm of a partner instrument where the ensemble or rhythm is tricky to navigate. Example 6 is an excerpt of the Strauss part mentioned earlier, with a written-in English horn cue. This cue is important to entering accurately, especially because of a slight ritard (marked by a squiggly line) in the previous measure.
Ex. 6: Also Sprach Zarathustra, Harp 2, by Johann Strauss
Note the eyeglasses to watch the conductor, the English horn rhythm to help prepare the harp entrance, and the marked measures of cues.
A few months ago I performed Gustav Mahler’s second symphony for the first time. The harp enters within the first movement after counting numerous measures of rest, and I noted what to listen for in the strings. See Ex. 7 In this same example, I wrote in other rhythms, instrumental cues, and numbered my measures. If cues are printed on the page, I number these and circle the last measure. I also circle the last measure in my own part.
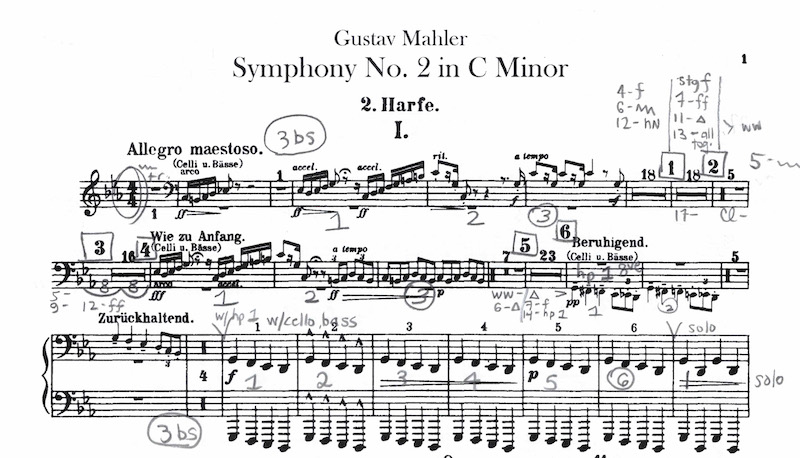
Ex. 7: Symphony No. 2, Movement 1, Harp 2, by Gustav Mahler
Note the measure number and instrumental cues, the string rhythm at 19, the numbered measures of repetition in the harp, and the pedal graph with circled pedal changes.
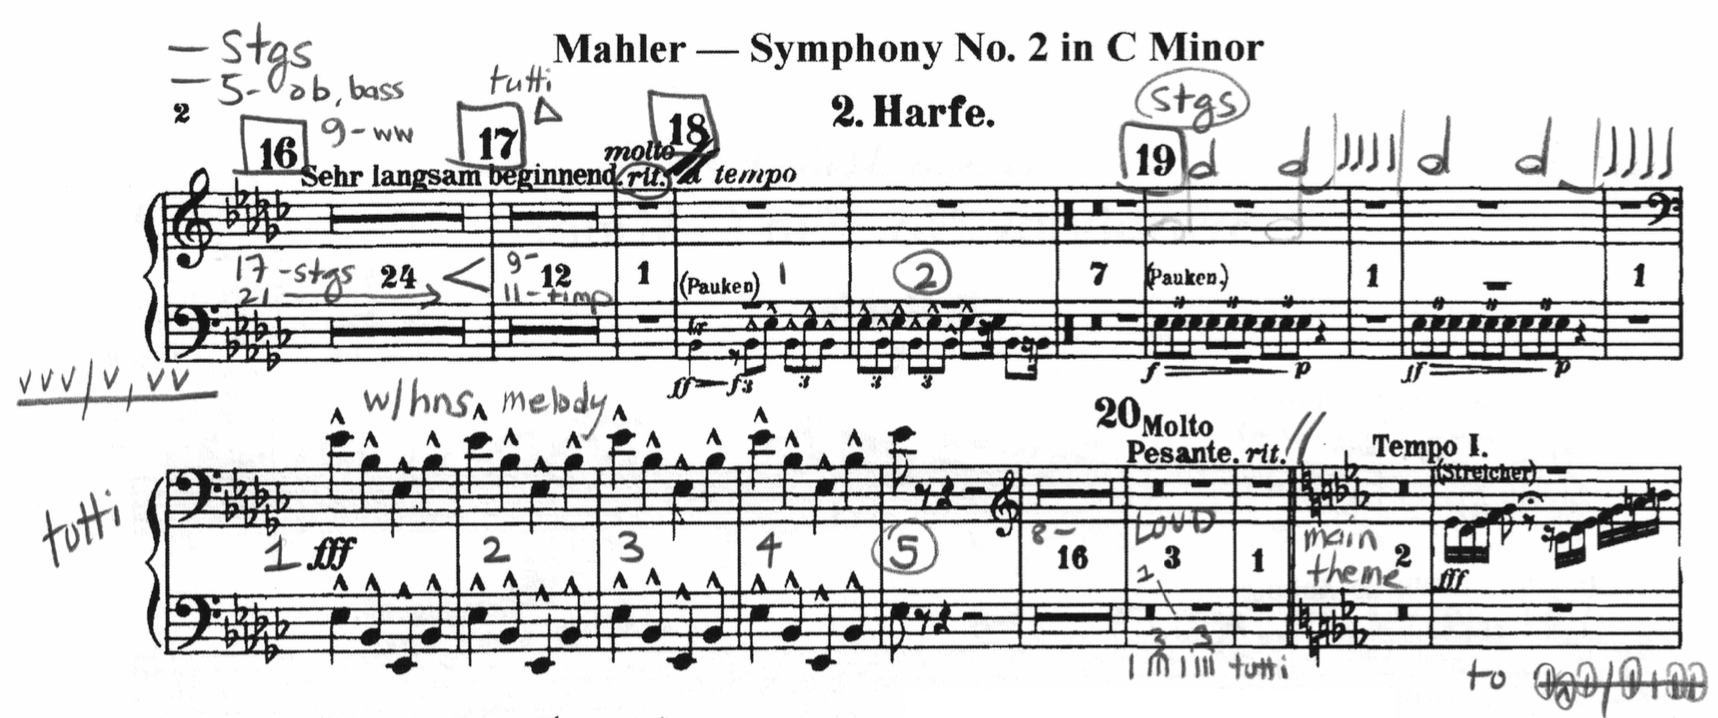
Ex. 8: Symphony No. 2, Movement III, Harp 2, by Gustav Mahler
Note the indication of an 8+8 phrase within a 16-bar rest.
I’ve adopted new approaches along the way. For instance, if there are numerous measures of rest, I’ll listen for 4+4 phrases (or 2+2, or 8+8, etc.). Then, I’ll draw a mini phrase marking within the measure indicating these natural phrases in the ensemble. Not only does this method help in feeling the natural phrases of the music, it helps with the visual acuity and staying on track during these measures of rest. See Ex. 8
In the next example, note the numbered bars, measures indicating changes in texture of music (sometimes simply drawn on with squiggles, arrows, or dots, etc.), and also Harp 1 cues. See Ex. 9
Ex. 9: Symphony No. 2, Movement I, Harp 2, by Gustav Mahler
Note the numbered measures of rest, cue markings, and clear key indications.
I will also draw a triangle by a measure number to indicate a harmony, color, or textural change in the music. This is the Greek letter “delta,” and in math it means “change.” See Ex. 10. I’ve found this small and simple marking to be one of the most important I’ve ever used in ensemble music. It ties together not only what my eyes see on the page, or what preparation I have done with my ears while learning the music forward and backward, but it also confirms my internal counting. These are perfect examples of active learning and go hand-in-hand with what kind of solid preparation we all need to do to challenge ourselves to be at the highest level of performance.
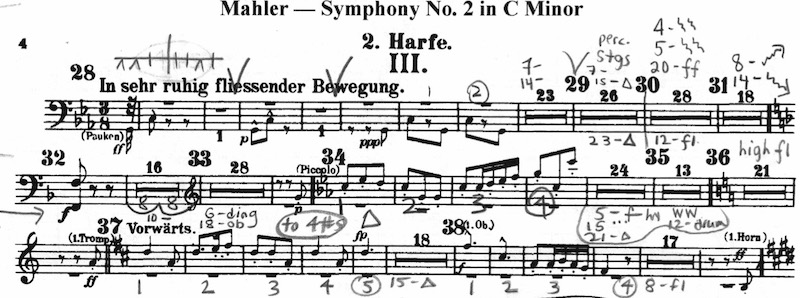
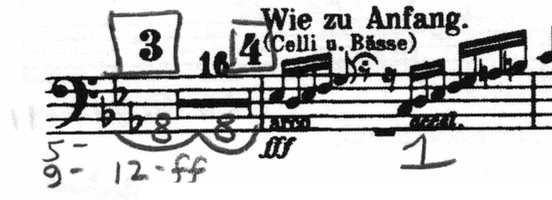
Ex. 10: Symphony No. 2, Movement III, Harp 2, by Gustav Mahler
Note the triangle (delta) sign in several places to indicate a textural change or color change during measures of rest. There are also ascending and descending arrows, indicating texture in the music.
Reaching your final destination
I love seeing other harpists’ markings on their music; they express a part of who these harpists are and how they experience and interpret the music they are playing. As for Also Sprach Zarathustra, I think the most helpful marking in the pre-marked Harp 2 part was towards the very end: “Watch K.” Knowing this ahead of time, at the first rehearsal I simply just replaced “K” with the first initial of the first harpist, “C” for Cheryl Losey Feder, and the ending felt great.
Just as visual artists use their medium to express themselves, dancers use choreography and costumes to express their dance, or creative writers play with words to create their stories, we musicians tell stories often stemming from black and white representations of a composer’s music on a piece of paper. Not only do composers mark their intentions on the music, but as harpists, artists, and performers we must also note our intentions in order to create the best version of our music that we would like to share. This expression and creativity provides more focus and consistency as our music reaches its final destination. Helen Keller expresses our marvel the best: “There are no shortcuts to any place worth going.” •